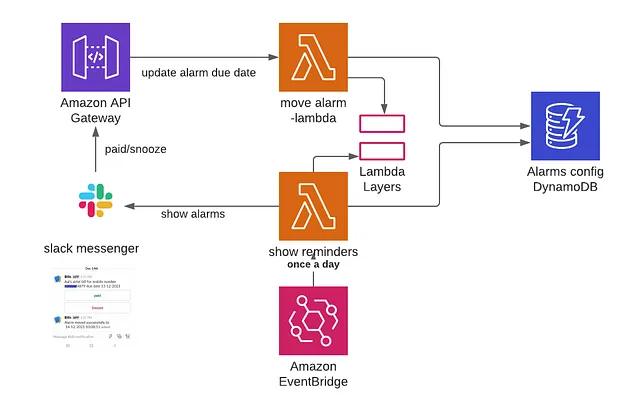
Automatically Restart inactive EC2 instance via AWS Lambda , Boto, and notifying an instance outage to Slack
Amazon Web Services (AWS) has become one of the most popular cloud computing services, providing a wide range of tools and services to help businesses run their operations smoothly and efficiently. Among its many offerings, the Elastic Compute Cloud (EC2) is a powerful and flexible service that allows users to easily deploy and manage virtual servers in the cloud.
However, even the most reliable systems can experience failures, and when an EC2 instance fails a status check, it can cause serious disruptions to your business. That’s where AWS Lambda comes in. With its ability to execute code automatically in response to events, Lambda provides an easy way to reboot a failed EC2 instance and send notifications to Slack, a popular team communication platform.
Slack is a popular team communication platform that allows teams to collaborate and communicate effectively in real time. It provides a range of features such as chat rooms, direct messaging, file sharing, and integrations with other services, making it a powerful tool for remote and distributed teams.
Slack is widely used by companies of all sizes, from small startups to large enterprises, to improve team productivity, streamline workflows, and enhance communication. With its powerful API, Slack can also be integrated with other services, allowing users to automate workflows and notifications. In this blog, we will show you how to integrate Slack with AWS Lambda to send notifications when an EC2 instance fails a status check.
Step 1: Create an incoming webhook for the channel where you want notifications by going to slack.com. Sign up for Slack and do that. If you don’t have a channel, create one.
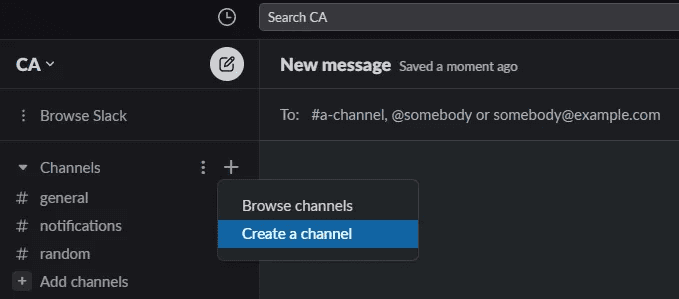
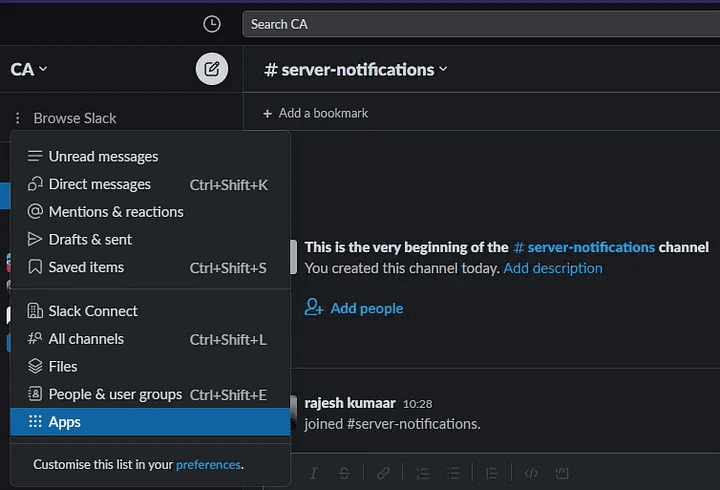
After creating the channel, select Browse Slack and then select Apps.
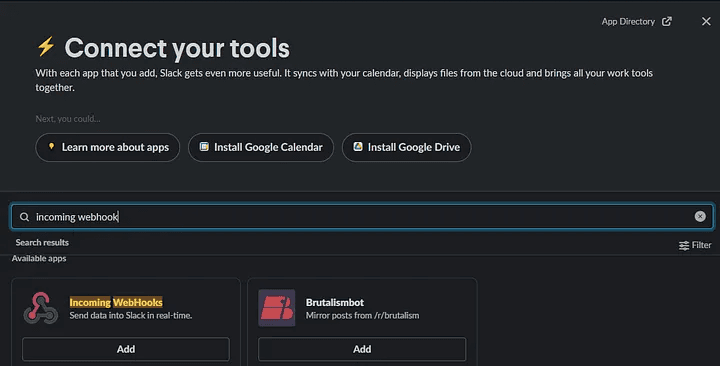
Step 2: Search for incoming webhook and click on add.
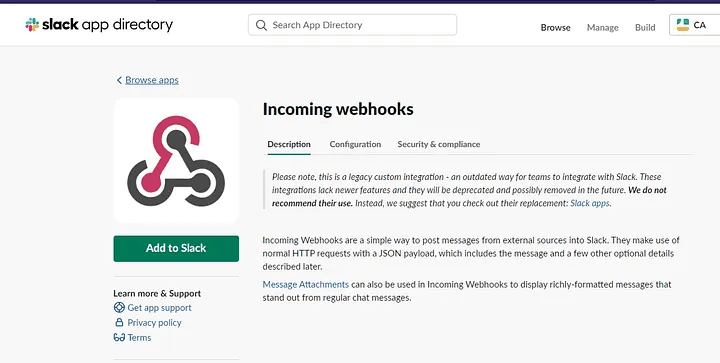
Step 3: Click on add to slack.
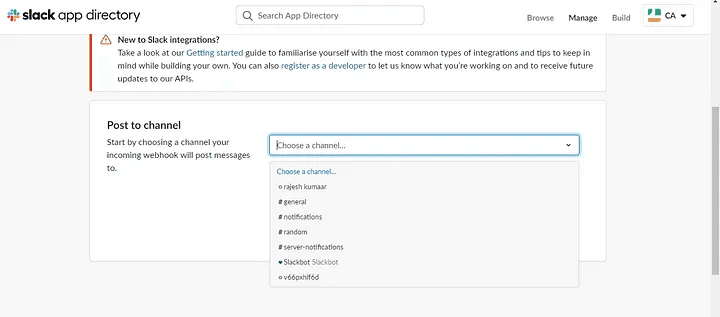
Step 4: Decide which channel you want notifications on. Next, select Add. You’ll then receive all the information regarding the incoming webhook.
Now let's move on to AWS;
AWS EC2 instances are one of the most widely used services in the cloud computing world. They provide a scalable and flexible infrastructure to run various applications and services. However, like any other system, EC2 instances can encounter issues that may cause them to fail the status check. This can lead to unexpected downtime and impact your application’s or service’s overall performance. To ensure the high availability and reliability of your EC2 instances, it’s crucial to have a mechanism that can automatically detect and remediate such issues.
One of the ways to achieve this is by using AWS Lambda, a serverless computing service that allows you to run code without provisioning or managing servers.
In this part of the blog, I’ll walk you through the steps to create a Lambda function that can detect the failed status check of an EC2 instance and automatically reboot it to restore its health. So let’s get started!
Step 1: We must first create a role and grant the required permission:
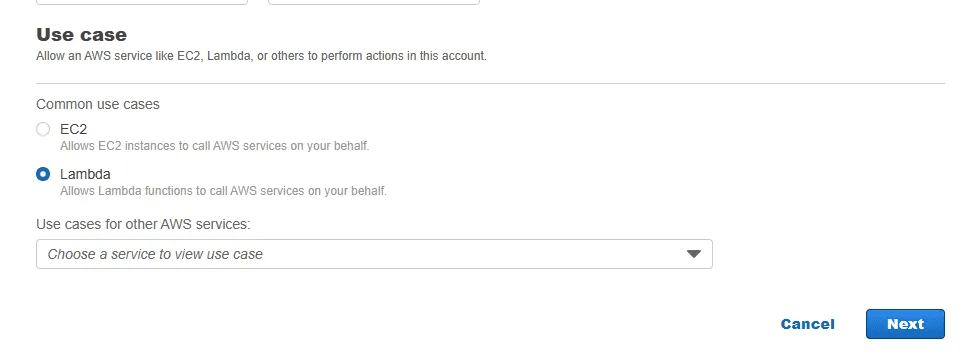
Click on create new role under AWS IAM Roles. Keep the other setting set to its default value. Choose the Lambda use case, after which select next.
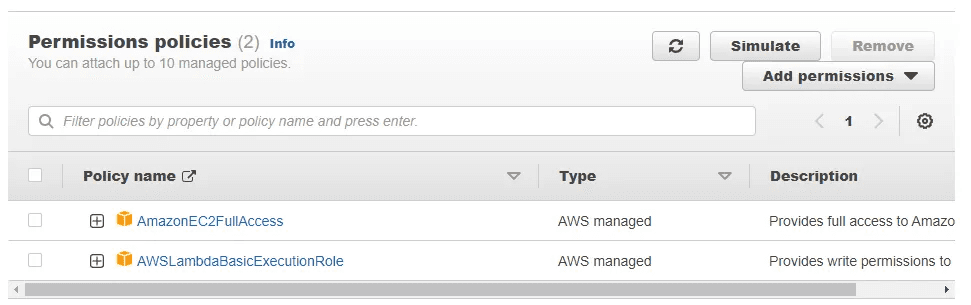
Step 2: Add the following 2 permission policies: AWSLambdaBasicExecutionRole and AmazonEC2FullAccess. Choose next. Give your role a suitable name and click the “create role” button on the following screen.
We have now successfully created a position and allocated the necessary permissions.
Step 3: We must now create a lambda function. Click “Create function” on the AWS Lambda page.
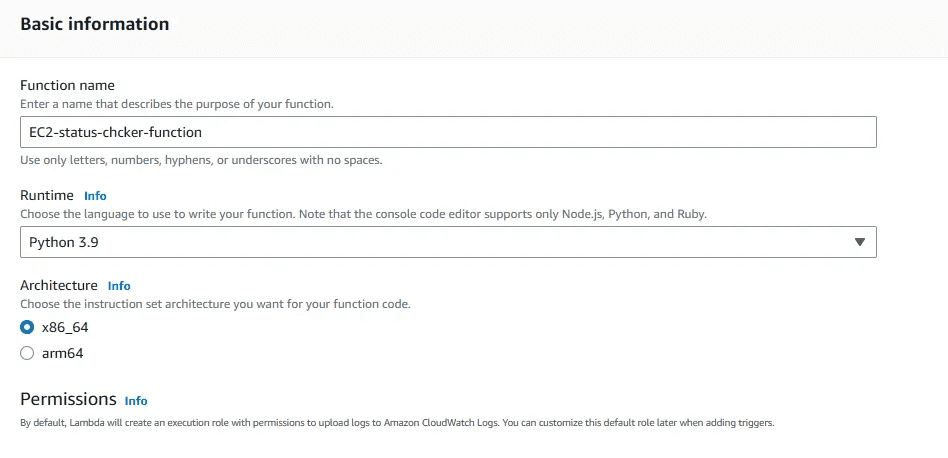
Complete the basic details
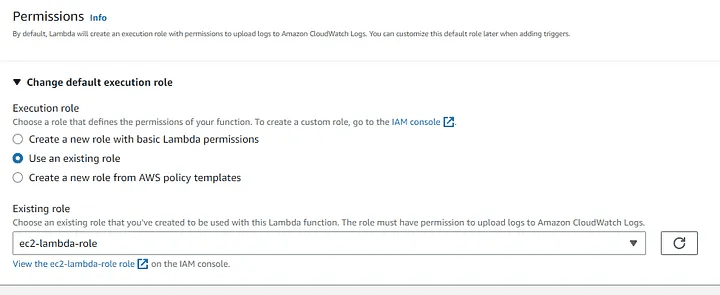
Step 4: Click Change default execution role, which is located beneath the permissions section.
The role that we previously created can be chosen by selecting Use an Existing role. (If you’d like, you may also create a new role similar to the one we just made.) then select the create function button.
Now, our function is created. The above code will detect whether the EC2 instances are impaired or not and send a message to slack if found.
import boto3
import requests
import json
webhook_url = "https://hooks.slack.com/services/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"
def lambda_handler(event, context):
ec2 = boto3.client("ec2")
status = ec2.describe_instance_status(IncludeAllInstances=True)
for i in status["InstanceStatuses"]:
instanceId = i["InstanceId"]
InstanceState = i["InstanceState"]['Name']
status = i["InstanceStatus"]["Status"]
print(instanceId, ": ", status)
if status == 'impaired':
# ec2.stop_instances(InstanceIds=[instanceId])
payloadText = "EC2_ID-" + instanceId + " Is impaired"
ec2.reboot_instances(InstanceIds=[instanceId]) #reboot EC2
payload = {"text": payloadText}
requests.post(webhook_url, json.dumps(payload)) #send notification to slack
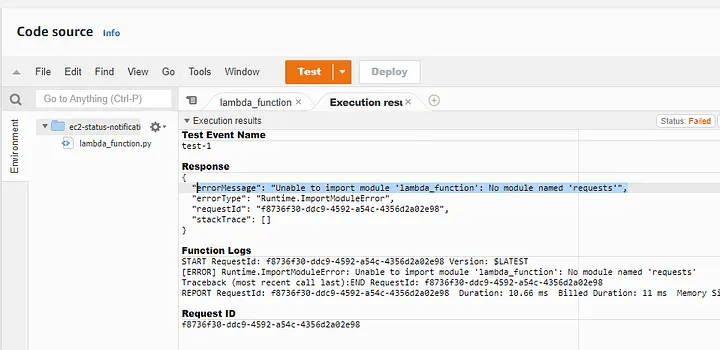
print("finished")Step 5: Choose Test. As you can see, that results in a module error. We will now look at how to import an external Python module into Amazon Lambda.
Step 6: As quickly as possible, launch the S3 console, create an S3 bucket, and give it a unique name. The generated zip package will be saved here. Save the name somewhere safe.
Launch the AWS Cloudshell. It’s at the top right corner of the console.
Represents the picture.
Step 7: Run the following commands in the CloudShell:
mkdir packages
cd packages
python3 -m venv venv
source venv/bin/activate
mkdir python
cd python
Now, install the package that you require using the pip command. Consider this as an example:
pip install requests -t
We will be utilizing those packages for lambda. Prior to zipping the Python folder in which they are stored, let’s free up some space by removing any items with the “.dis-info” extension. They are unnecessary.
The following command is the best approach to do this.
rm -rf *dist-info
Step 8: With the cd.. command, we can now exit the Python directory.
The Python directory will now be zip-filed and give a suitable name. To do this, use the command below.
zip -r lambda-package-name.zip python
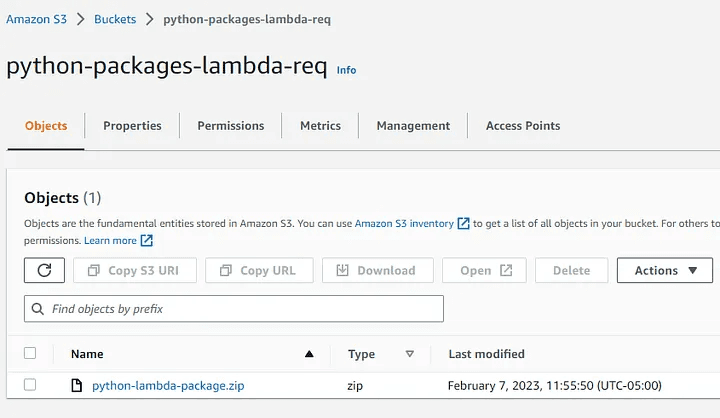
Step 9: Next, upload the packaged zip into the s3 bucket you created earlier. The command should look like the below:
aws s3 cp python-lambda-package.zip s3://your-s3-bucket-name/
Now, if you go to that bucket, you can find the zip uploaded on the bucket:
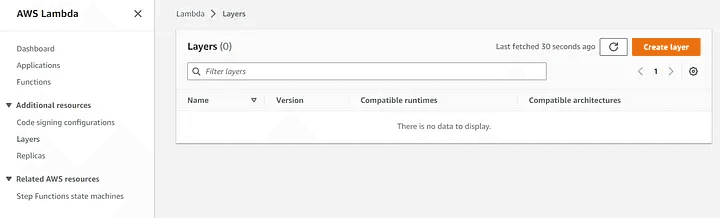
Step 10: Create a layer now, and then upload the packages. Click on add a new layer under layers as seen below:
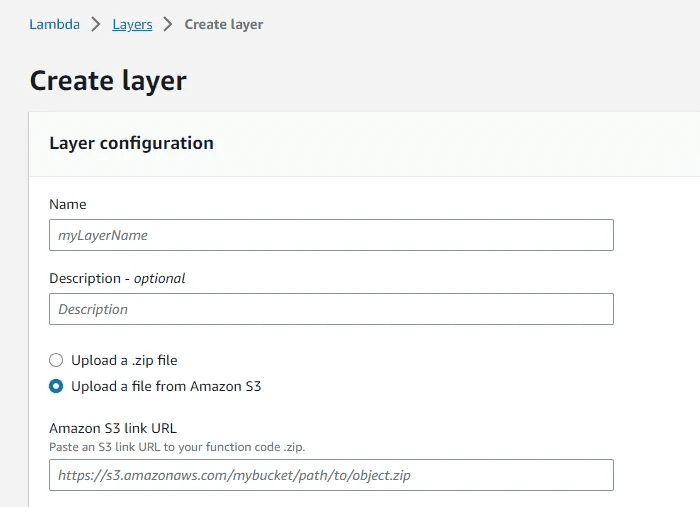
Step 11: Name the layer and select the option to upload a file from Amazon S3. Copy the URL from the zip file and paste it where indicated. Lastly, choose to Create layer. Ensure to choose the appropriate Compatible runtimes.
Step 12: Let’s now link the layer with the function. Go down to the Layers section of the Lambda function page. To add a layer, select it.
Choose custom layers, choose the layer we made, and then click Add.
In this way, we may add an external module to the AWS lambda function. Your code should now run smoothly and without issues. You’ll also receive the appropriate notification on Slack.

Please see the example image.
Reference:
EC2 - Boto3 Docs 1.26.74 documentation
https://boto3.amazonaws.com/v1/documentation/api/latest/reference/services/ec2.html
A low-level client representing Amazon Elastic Compute Cloud (EC2) Amazon Elastic Compute Cloud (Amazon EC2) provides…
boto3.amazonaws.com
Add External Python Libraries to AWS Lambda using Lambda Layers
https://www.linkedin.com/pulse/add-external-python-libraries-aws-lambda-using-layers-gabe-olokun
If you are a Cloud Engineer or Developer who loves to code in python like myself, 7 out of 10 times, you might find…
www.linkedin.com
I hope this article was informative and provided you with the details you required. If you have any questions related while reading the blog, message me on Instagram or LinkedIn. For any kind of work related to DevOps, Site Reliability you can contact me at helpmeanubhav@gmail.com
Special credits to my team members: Gaurav Kachariya and Krisha Amlani.
Thank You…
Amazon Web Services (AWS) has become one of the most popular cloud computing services, providing a wide range of tools and services to help businesses run their operations smoothly and efficiently. Among its many offerings, the Elastic Compute Cloud (EC2) is a powerful and flexible service that allows users to easily deploy and manage virtual servers in the cloud.
However, even the most reliable systems can experience failures, and when an EC2 instance fails a status check, it can cause serious disruptions to your business. That’s where AWS Lambda comes in. With its ability to execute code automatically in response to events, Lambda provides an easy way to reboot a failed EC2 instance and send notifications to Slack, a popular team communication platform.
Slack is a popular team communication platform that allows teams to collaborate and communicate effectively in real time. It provides a range of features such as chat rooms, direct messaging, file sharing, and integrations with other services, making it a powerful tool for remote and distributed teams.
Slack is widely used by companies of all sizes, from small startups to large enterprises, to improve team productivity, streamline workflows, and enhance communication. With its powerful API, Slack can also be integrated with other services, allowing users to automate workflows and notifications. In this blog, we will show you how to integrate Slack with AWS Lambda to send notifications when an EC2 instance fails a status check.
Step 1: Create an incoming webhook for the channel where you want notifications by going to slack.com. Sign up for Slack and do that. If you don’t have a channel, create one.
After creating the channel, select Browse Slack and then select Apps.
Step 2: Search for incoming webhook and click on add.
Step 3: Click on add to slack.
Step 4: Decide which channel you want notifications on. Next, select Add. You’ll then receive all the information regarding the incoming webhook.
Now let's move on to AWS;
AWS EC2 instances are one of the most widely used services in the cloud computing world. They provide a scalable and flexible infrastructure to run various applications and services. However, like any other system, EC2 instances can encounter issues that may cause them to fail the status check. This can lead to unexpected downtime and impact your application’s or service’s overall performance. To ensure the high availability and reliability of your EC2 instances, it’s crucial to have a mechanism that can automatically detect and remediate such issues.
One of the ways to achieve this is by using AWS Lambda, a serverless computing service that allows you to run code without provisioning or managing servers.
In this part of the blog, I’ll walk you through the steps to create a Lambda function that can detect the failed status check of an EC2 instance and automatically reboot it to restore its health. So let’s get started!
Step 1: We must first create a role and grant the required permission:
Click on create new role under AWS IAM Roles. Keep the other setting set to its default value. Choose the Lambda use case, after which select next.
Step 2: Add the following 2 permission policies: AWSLambdaBasicExecutionRole and AmazonEC2FullAccess. Choose next. Give your role a suitable name and click the “create role” button on the following screen.
We have now successfully created a position and allocated the necessary permissions.
Step 3: We must now create a lambda function. Click “Create function” on the AWS Lambda page.
Complete the basic details
Step 4: Click Change default execution role, which is located beneath the permissions section.
The role that we previously created can be chosen by selecting Use an Existing role. (If you’d like, you may also create a new role similar to the one we just made.) then select the create function button.
Now, our function is created. The above code will detect whether the EC2 instances are impaired or not and send a message to slack if found.
import boto3
import requests
import json
webhook_url = "https://hooks.slack.com/services/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"
def lambda_handler(event, context):
ec2 = boto3.client("ec2")
status = ec2.describe_instance_status(IncludeAllInstances=True)
for i in status["InstanceStatuses"]:
instanceId = i["InstanceId"]
InstanceState = i["InstanceState"]['Name']
status = i["InstanceStatus"]["Status"]
print(instanceId, ": ", status)
if status == 'impaired':
# ec2.stop_instances(InstanceIds=[instanceId])
payloadText = "EC2_ID-" + instanceId + " Is impaired"
ec2.reboot_instances(InstanceIds=[instanceId]) #reboot EC2
payload = {"text": payloadText}
requests.post(webhook_url, json.dumps(payload)) #send notification to slack
print("finished")Step 5: Choose Test. As you can see, that results in a module error. We will now look at how to import an external Python module into Amazon Lambda.
Step 6: As quickly as possible, launch the S3 console, create an S3 bucket, and give it a unique name. The generated zip package will be saved here. Save the name somewhere safe.
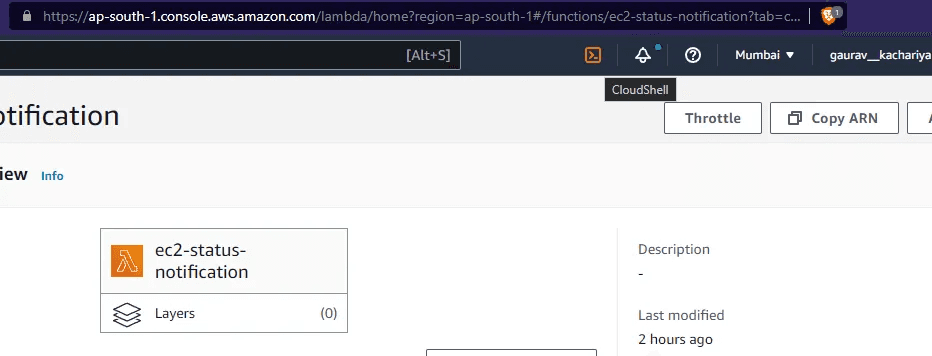
Launch the AWS Cloudshell. It’s at the top right corner of the console.
Represents the picture.
Step 7: Run the following commands in the CloudShell:
mkdir packages
cd packages
python3 -m venv venv
source venv/bin/activate
mkdir python
cd python
Now, install the package that you require using the pip command. Consider this as an example:
pip install requests -t
We will be utilizing those packages for lambda. Prior to zipping the Python folder in which they are stored, let’s free up some space by removing any items with the “.dis-info” extension. They are unnecessary.
The following command is the best approach to do this.
rm -rf *dist-info
Step 8: With the cd.. command, we can now exit the Python directory.
The Python directory will now be zip-filed and give a suitable name. To do this, use the command below.
zip -r lambda-package-name.zip python
Step 9: Next, upload the packaged zip into the s3 bucket you created earlier. The command should look like the below:
aws s3 cp python-lambda-package.zip s3://your-s3-bucket-name/
Now, if you go to that bucket, you can find the zip uploaded on the bucket:
Step 10: Create a layer now, and then upload the packages. Click on add a new layer under layers as seen below:
Step 11: Name the layer and select the option to upload a file from Amazon S3. Copy the URL from the zip file and paste it where indicated. Lastly, choose to Create layer. Ensure to choose the appropriate Compatible runtimes.
Step 12: Let’s now link the layer with the function. Go down to the Layers section of the Lambda function page. To add a layer, select it.
Choose custom layers, choose the layer we made, and then click Add.
In this way, we may add an external module to the AWS lambda function. Your code should now run smoothly and without issues. You’ll also receive the appropriate notification on Slack.
Please see the example image.
Reference:
EC2 - Boto3 Docs 1.26.74 documentation
https://boto3.amazonaws.com/v1/documentation/api/latest/reference/services/ec2.html
A low-level client representing Amazon Elastic Compute Cloud (EC2) Amazon Elastic Compute Cloud (Amazon EC2) provides…
boto3.amazonaws.com
Add External Python Libraries to AWS Lambda using Lambda Layers
https://www.linkedin.com/pulse/add-external-python-libraries-aws-lambda-using-layers-gabe-olokun
If you are a Cloud Engineer or Developer who loves to code in python like myself, 7 out of 10 times, you might find…
www.linkedin.com
I hope this article was informative and provided you with the details you required. If you have any questions related while reading the blog, message me on Instagram or LinkedIn. For any kind of work related to DevOps, Site Reliability you can contact me at helpmeanubhav@gmail.com
Special credits to my team members: Gaurav Kachariya and Krisha Amlani.
Thank You…
Amazon Web Services (AWS) has become one of the most popular cloud computing services, providing a wide range of tools and services to help businesses run their operations smoothly and efficiently. Among its many offerings, the Elastic Compute Cloud (EC2) is a powerful and flexible service that allows users to easily deploy and manage virtual servers in the cloud.
However, even the most reliable systems can experience failures, and when an EC2 instance fails a status check, it can cause serious disruptions to your business. That’s where AWS Lambda comes in. With its ability to execute code automatically in response to events, Lambda provides an easy way to reboot a failed EC2 instance and send notifications to Slack, a popular team communication platform.
Slack is a popular team communication platform that allows teams to collaborate and communicate effectively in real time. It provides a range of features such as chat rooms, direct messaging, file sharing, and integrations with other services, making it a powerful tool for remote and distributed teams.
Slack is widely used by companies of all sizes, from small startups to large enterprises, to improve team productivity, streamline workflows, and enhance communication. With its powerful API, Slack can also be integrated with other services, allowing users to automate workflows and notifications. In this blog, we will show you how to integrate Slack with AWS Lambda to send notifications when an EC2 instance fails a status check.
Step 1: Create an incoming webhook for the channel where you want notifications by going to slack.com. Sign up for Slack and do that. If you don’t have a channel, create one.
After creating the channel, select Browse Slack and then select Apps.
Step 2: Search for incoming webhook and click on add.
Step 3: Click on add to slack.
Step 4: Decide which channel you want notifications on. Next, select Add. You’ll then receive all the information regarding the incoming webhook.
Now let's move on to AWS;
AWS EC2 instances are one of the most widely used services in the cloud computing world. They provide a scalable and flexible infrastructure to run various applications and services. However, like any other system, EC2 instances can encounter issues that may cause them to fail the status check. This can lead to unexpected downtime and impact your application’s or service’s overall performance. To ensure the high availability and reliability of your EC2 instances, it’s crucial to have a mechanism that can automatically detect and remediate such issues.
One of the ways to achieve this is by using AWS Lambda, a serverless computing service that allows you to run code without provisioning or managing servers.
In this part of the blog, I’ll walk you through the steps to create a Lambda function that can detect the failed status check of an EC2 instance and automatically reboot it to restore its health. So let’s get started!
Step 1: We must first create a role and grant the required permission:
Click on create new role under AWS IAM Roles. Keep the other setting set to its default value. Choose the Lambda use case, after which select next.
Step 2: Add the following 2 permission policies: AWSLambdaBasicExecutionRole and AmazonEC2FullAccess. Choose next. Give your role a suitable name and click the “create role” button on the following screen.
We have now successfully created a position and allocated the necessary permissions.
Step 3: We must now create a lambda function. Click “Create function” on the AWS Lambda page.
Complete the basic details
Step 4: Click Change default execution role, which is located beneath the permissions section.
The role that we previously created can be chosen by selecting Use an Existing role. (If you’d like, you may also create a new role similar to the one we just made.) then select the create function button.
Now, our function is created. The above code will detect whether the EC2 instances are impaired or not and send a message to slack if found.
import boto3
import requests
import json
webhook_url = "https://hooks.slack.com/services/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"
def lambda_handler(event, context):
ec2 = boto3.client("ec2")
status = ec2.describe_instance_status(IncludeAllInstances=True)
for i in status["InstanceStatuses"]:
instanceId = i["InstanceId"]
InstanceState = i["InstanceState"]['Name']
status = i["InstanceStatus"]["Status"]
print(instanceId, ": ", status)
if status == 'impaired':
# ec2.stop_instances(InstanceIds=[instanceId])
payloadText = "EC2_ID-" + instanceId + " Is impaired"
ec2.reboot_instances(InstanceIds=[instanceId]) #reboot EC2
payload = {"text": payloadText}
requests.post(webhook_url, json.dumps(payload)) #send notification to slack
print("finished")Step 5: Choose Test. As you can see, that results in a module error. We will now look at how to import an external Python module into Amazon Lambda.
Step 6: As quickly as possible, launch the S3 console, create an S3 bucket, and give it a unique name. The generated zip package will be saved here. Save the name somewhere safe.
Launch the AWS Cloudshell. It’s at the top right corner of the console.
Represents the picture.
Step 7: Run the following commands in the CloudShell:
mkdir packages
cd packages
python3 -m venv venv
source venv/bin/activate
mkdir python
cd python
Now, install the package that you require using the pip command. Consider this as an example:
pip install requests -t
We will be utilizing those packages for lambda. Prior to zipping the Python folder in which they are stored, let’s free up some space by removing any items with the “.dis-info” extension. They are unnecessary.
The following command is the best approach to do this.
rm -rf *dist-info
Step 8: With the cd.. command, we can now exit the Python directory.
The Python directory will now be zip-filed and give a suitable name. To do this, use the command below.
zip -r lambda-package-name.zip python
Step 9: Next, upload the packaged zip into the s3 bucket you created earlier. The command should look like the below:
aws s3 cp python-lambda-package.zip s3://your-s3-bucket-name/
Now, if you go to that bucket, you can find the zip uploaded on the bucket:
Step 10: Create a layer now, and then upload the packages. Click on add a new layer under layers as seen below:
Step 11: Name the layer and select the option to upload a file from Amazon S3. Copy the URL from the zip file and paste it where indicated. Lastly, choose to Create layer. Ensure to choose the appropriate Compatible runtimes.
Step 12: Let’s now link the layer with the function. Go down to the Layers section of the Lambda function page. To add a layer, select it.
Choose custom layers, choose the layer we made, and then click Add.
In this way, we may add an external module to the AWS lambda function. Your code should now run smoothly and without issues. You’ll also receive the appropriate notification on Slack.
Please see the example image.
Reference:
EC2 - Boto3 Docs 1.26.74 documentation
https://boto3.amazonaws.com/v1/documentation/api/latest/reference/services/ec2.html
A low-level client representing Amazon Elastic Compute Cloud (EC2) Amazon Elastic Compute Cloud (Amazon EC2) provides…
boto3.amazonaws.com
Add External Python Libraries to AWS Lambda using Lambda Layers
https://www.linkedin.com/pulse/add-external-python-libraries-aws-lambda-using-layers-gabe-olokun
If you are a Cloud Engineer or Developer who loves to code in python like myself, 7 out of 10 times, you might find…
www.linkedin.com
I hope this article was informative and provided you with the details you required. If you have any questions related while reading the blog, message me on Instagram or LinkedIn. For any kind of work related to DevOps, Site Reliability you can contact me at helpmeanubhav@gmail.com
Special credits to my team members: Gaurav Kachariya and Krisha Amlani.
Thank You…