
Creating a Pipeline between Github action and EC2 instance for building a docker image and network
Contents:
Introduction
Establish a pipeline between Github and EC2 instance.
The definition of a pipeline with regard to DevOps must first be understood in order for us to comprehend the design of a pipeline fully.
A pipeline is a group of automated procedures or tools that developers use to create and release code into a live environment. Generally speaking, a pipeline consists of three primary parts:
Build automation/continuous integration
Test automation
Deploy automation
It generally contains a set of tools that are divided into the following parts :
Source Control
Build tools
Containerization
Configuration Management
Monitoring
Let’s go on and see how to use the procedures listed below to establish a pipeline between a GitHub activity and an EC2 instance:
Open the AWS site and log in with your credentials using the URL below:
Cloud Computing Services - Amazon Web Services (AWS)
Whether you're looking for computing power, database storage, content delivery, or other functionality, AWS has the…
aws.amazon.com
2. Create an IAM user, role, and policy additions to accompany it. To add a new user, click the add new user button now.
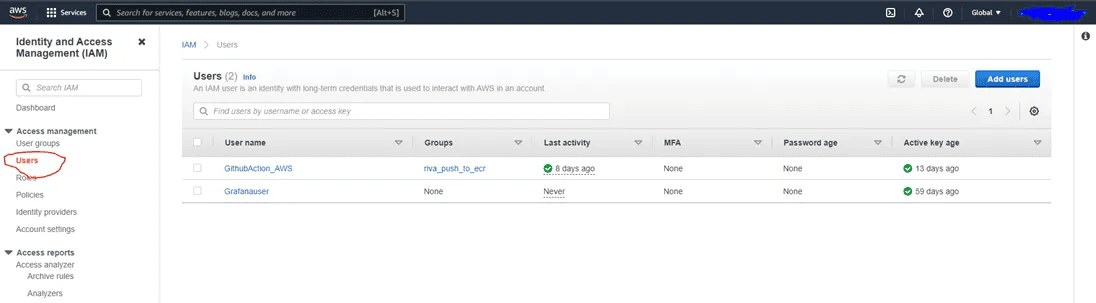
Click on Access Management
3. After that click on the next option.
Add a User
4. Now review the user permission and all page will appear.
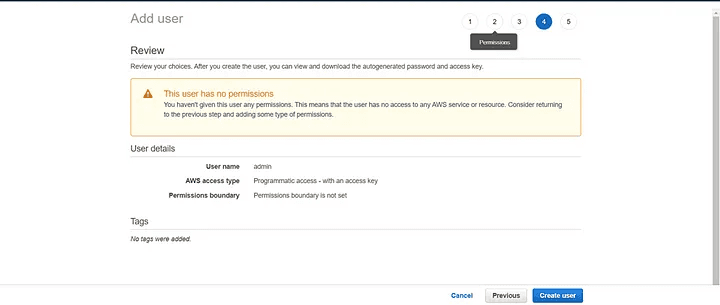
Review the permissions
5. Next step is to download the CSV file for future use.
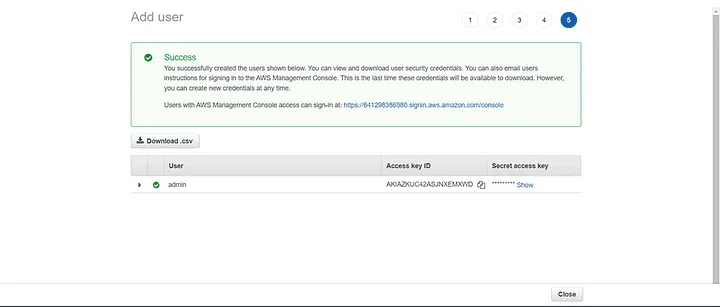
Save the CSV file
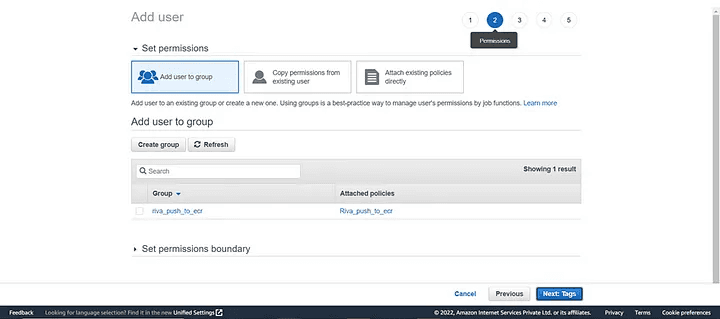
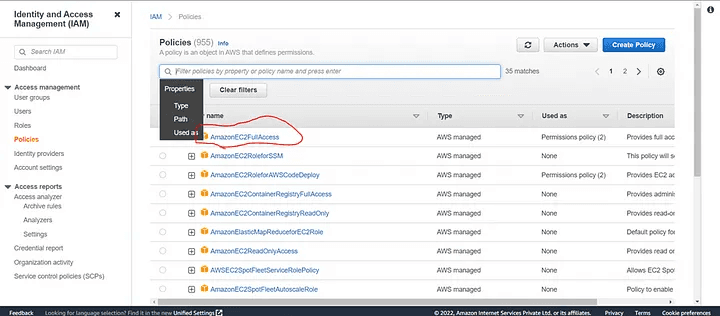
6. Create a role now, add a policy, and provide AmazonEC2FullAccess access.
Give Access
7. Select your IAM profile after this and launch the instance.
Select the IAM profile
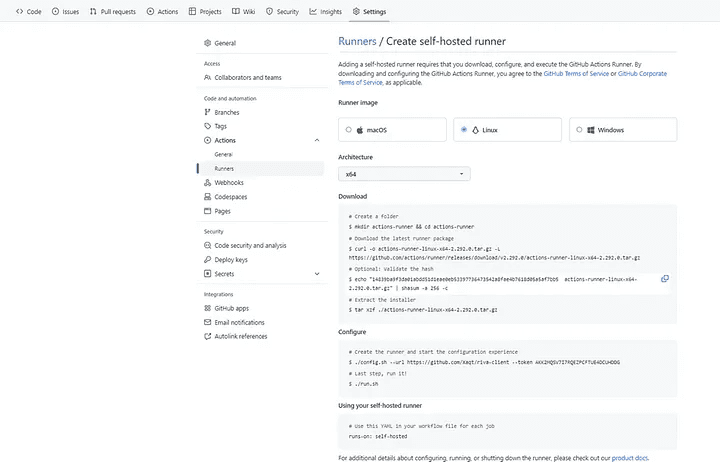
8. Go to action -> runners script in the repository_settings and follow the instructions on the window. Keep in mind that the runner's key is crucial during setup.
Do the changes
9. Now Create a workflow using the GitHub repository’s action menu.
Actions Menu
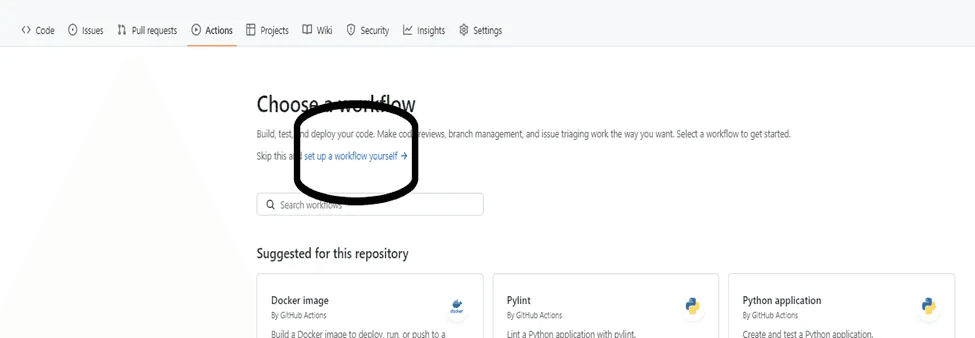
10. Now Select set up a workflow yourself in the New Workflow.
Choose a Workflow
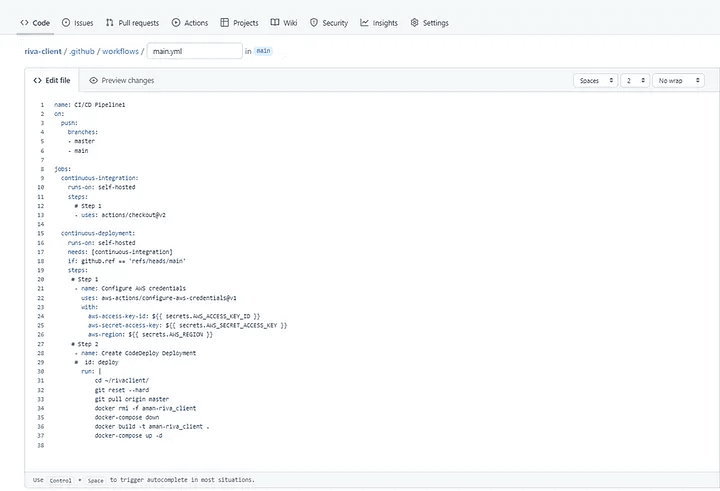
11. Create the main.yml file and write the code over here.
Main.yml
12. The main.yml code is as follows:
name: CI/CD Pipeline3
on:
push:
branches: [ main ]
jobs:
continuous-integration:
runs-on: self-hosted
steps:
# Step 1
- uses: actions/checkout@v2
continuous-deployment:
runs-on: self-hosted
needs: [continuous-integration]
if: github.ref == 'refs/heads/main'
steps:
# Step 1
- name: Configure AWS credentials
uses: aws-actions/configure-aws-credentials@v1
with:
aws-access-key-id: ${{ secrets.AWS_ACCESS_KEY_ID }}
aws-secret-access-key: ${{ secrets.AWS_SECRET_ACCESS_KEY }}
aws-region: ${{ secrets.AWS_REGION }}
# Step 2
- name: Create CodeDeploy Deployment
# id: deploy
run: |
cd ~/Riva_client/
# if [[ -d "~/anubhav/Riva_client" ]]
# then
# sudo rm -rf ~/anubhav/Riva_client
# fi
# git clone https://github.com/aniforverizon/Riva_client.git
# cd Riva_client
git reset --hard
git pull origin main
# docker container stop $(docker container ls -aq)
# docker rm -f $(docker ps -aq)
docker rmi -f heet
docker-compose down
docker build -t heet .
docker-compose up -d
I hope this article was informative and provided you with the details you required. If you have any questions related to Python or Azure Development, Coding, Blogging, or Tech Documentation while reading the blog, message me on Instagram or LinkedIn. For any kind of work related to DevOps, Site Reliability you can contact me at helpmeanubhav@gmail.com Special credits to my team members: Heet and Anshika.
Thank You…
Contents:
Introduction
Establish a pipeline between Github and EC2 instance.
The definition of a pipeline with regard to DevOps must first be understood in order for us to comprehend the design of a pipeline fully.
A pipeline is a group of automated procedures or tools that developers use to create and release code into a live environment. Generally speaking, a pipeline consists of three primary parts:
Build automation/continuous integration
Test automation
Deploy automation
It generally contains a set of tools that are divided into the following parts :
Source Control
Build tools
Containerization
Configuration Management
Monitoring
Let’s go on and see how to use the procedures listed below to establish a pipeline between a GitHub activity and an EC2 instance:
Open the AWS site and log in with your credentials using the URL below:
Cloud Computing Services - Amazon Web Services (AWS)
Whether you're looking for computing power, database storage, content delivery, or other functionality, AWS has the…
aws.amazon.com
2. Create an IAM user, role, and policy additions to accompany it. To add a new user, click the add new user button now.
Click on Access Management
3. After that click on the next option.
Add a User
4. Now review the user permission and all page will appear.
Review the permissions
5. Next step is to download the CSV file for future use.
Save the CSV file
6. Create a role now, add a policy, and provide AmazonEC2FullAccess access.
Give Access
7. Select your IAM profile after this and launch the instance.
Select the IAM profile
8. Go to action -> runners script in the repository_settings and follow the instructions on the window. Keep in mind that the runner's key is crucial during setup.
Do the changes
9. Now Create a workflow using the GitHub repository’s action menu.
Actions Menu
10. Now Select set up a workflow yourself in the New Workflow.
Choose a Workflow
11. Create the main.yml file and write the code over here.
Main.yml
12. The main.yml code is as follows:
name: CI/CD Pipeline3
on:
push:
branches: [ main ]
jobs:
continuous-integration:
runs-on: self-hosted
steps:
# Step 1
- uses: actions/checkout@v2
continuous-deployment:
runs-on: self-hosted
needs: [continuous-integration]
if: github.ref == 'refs/heads/main'
steps:
# Step 1
- name: Configure AWS credentials
uses: aws-actions/configure-aws-credentials@v1
with:
aws-access-key-id: ${{ secrets.AWS_ACCESS_KEY_ID }}
aws-secret-access-key: ${{ secrets.AWS_SECRET_ACCESS_KEY }}
aws-region: ${{ secrets.AWS_REGION }}
# Step 2
- name: Create CodeDeploy Deployment
# id: deploy
run: |
cd ~/Riva_client/
# if [[ -d "~/anubhav/Riva_client" ]]
# then
# sudo rm -rf ~/anubhav/Riva_client
# fi
# git clone https://github.com/aniforverizon/Riva_client.git
# cd Riva_client
git reset --hard
git pull origin main
# docker container stop $(docker container ls -aq)
# docker rm -f $(docker ps -aq)
docker rmi -f heet
docker-compose down
docker build -t heet .
docker-compose up -d
I hope this article was informative and provided you with the details you required. If you have any questions related to Python or Azure Development, Coding, Blogging, or Tech Documentation while reading the blog, message me on Instagram or LinkedIn. For any kind of work related to DevOps, Site Reliability you can contact me at helpmeanubhav@gmail.com Special credits to my team members: Heet and Anshika.
Thank You…