
Building a Competency Assesment tool via Power Automate Flow
We will learn to build a power automate flow to create a competency tool that will send a consolidated report once an employee fills out a form.

Automation
Contents:
Form 1 — Filled by Employees
Form 2 — Filled by Management
Microsoft Power Automate (formerly known as “Flow”) is a cloud-based service that allows users to create workflows themselves. Recurring routine tasks and processes in different programs/services can thus be automated. This makes working easier and more efficient. Until now, mapping and automating business processes were often only possible through programming. There were no standardized IT connectors. So far, workflows could only be realized with the SharePoint Designer within the Office environment. Microsoft Power Automate has solved this problem very well.
Step by Step flow :
Step 1: Our flow will trigger when the employee submits his or her self-assessment form. There are two connectors, the first of which is “when a new response is submitted,” as you can see in the figure below. We have included the form that the employee filled out in this. The second connector, “Get Response Details,” will gather the form’s information.

Competency Framework_1A
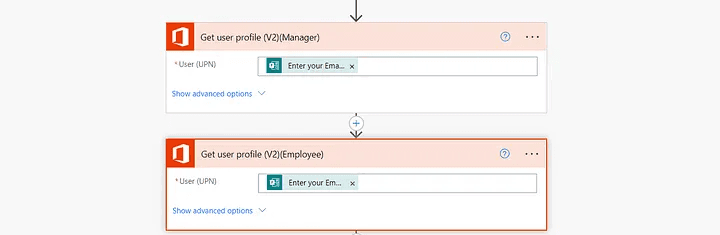
Step 2: As you can see in the image below, we have used an Office365 connector. The first connector is for Employee and will take the employee’s email address. The second connector is for the Manager and will take the manager’s email address. (Note: The employee’s and manager’s entries in that form are where the email address came from.)

Office365 Connector
Step 3: As you can see in the screenshot below, the connector for employees is called “Get File Content (Employee)”. And for this, we made the corresponding excel file. Therefore, we have selected this excel file for this.

File Content
Step 4: The connector labeled “Create File (Employee Copy)” in the figure below will create a copy of the employee response’s excel file, and we have titled this file “Employee’s Display Name_Employee’s Email.xlsx.” We selected the root path for the folder path, and the “Get File Content (Employee)” connector’s content was selected for the file content part.

Create File(Employee Copy)
Step 5: Now, as you can see in the graphic below, we will perform the same actions for the Manager as an employee. First, we’ll construct a connector called “Get File Content (Manager)”; within this, we’ll choose the spreadsheet we made for the Manager.
The “Create File (Manager Copy)” connector will then be added.
The root is located in this folder. The file has the following names: “Manager’s Display name_ Employee’s Display name_ Employee’s Email ID.xlsx” and its content is “Get File Content (Manager)” from the connector mentioned above.

File Content

Create File (Manager Copy)
Step 6: As you can see, we have added the Excel connector, called “Get a Row,” in the figure below. The specific row of the specified competency will be received by this connector. You may see the completed information in it here.
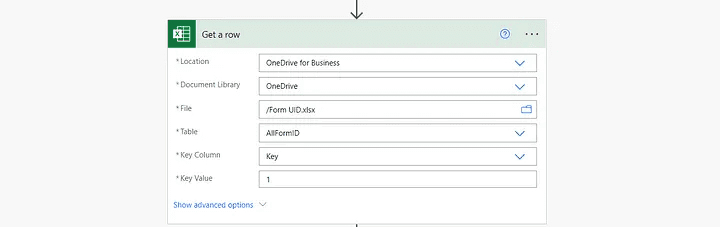
Get a Row
Step 7: As you can see in the screenshot below, we have added a connector called “Get File Content using path(Employee Excel)” where the file path is “Employee’s Display Name Employee’s Mail.xlsx.”

Get File Content using path(Employee Excel)
Step 8: As you can see, we have now included the Excel connector “Run Script (Generate Employee Graph)” in the image below. We have created a script called “FinalScript Sales Operations” for this connector. After choosing this script, all of the questions will be displayed to you. We will then fill out all of the form’s questions. And after that, we’ll choose the FormID for “Get a row.”
Run Script (Generate Employee Graph)
Step 9: Now that we have added the connector titled “Get File Content using path(Manager Excel),” you can see that the file path is “Manager’s Display Name_Employee’s Display Name_Employee’s Mail.xlsx” in the image below.

Get File Content using path(Manager Excel)
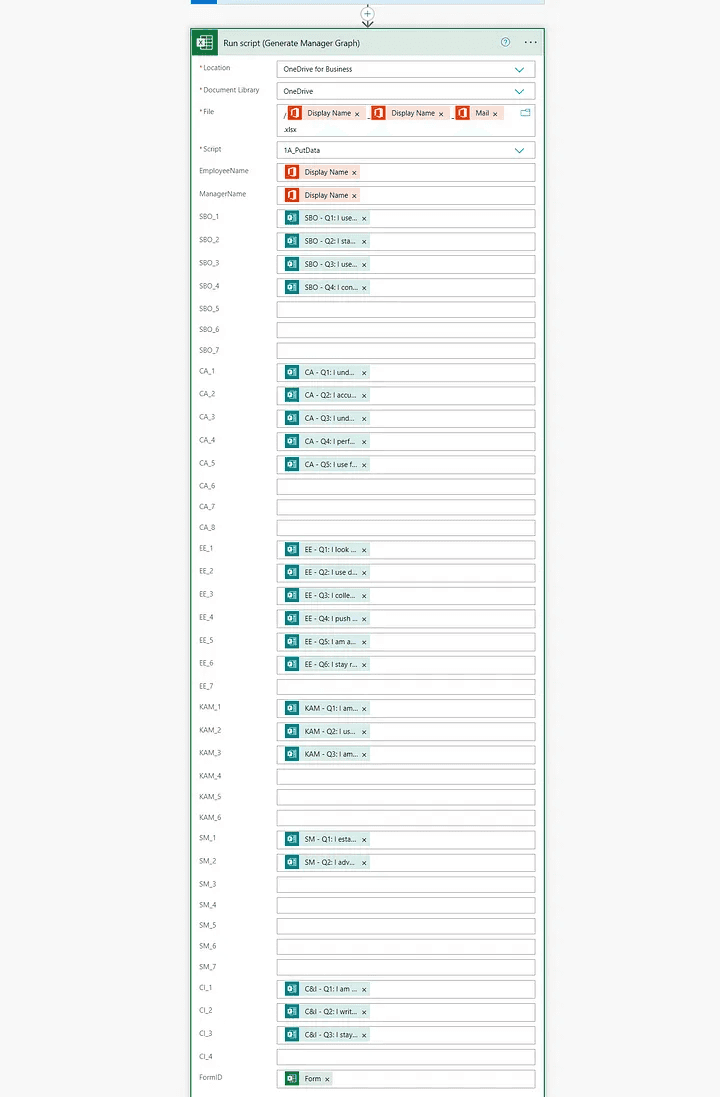
Step 10: As you can see, we have added the Excel connector “Run Script(Generate Manager Graph)” in the image below. We have created a script called “1A_PutData” for this connector. After choosing this script, all of the questions will be displayed to you. We will then fill out all of the form’s questions.
And after that, we’ll choose the FormID of “Get a row.”
The purpose of this run script is to display the graph in Manager’s Excel exactly as it appears on the employee’s graph.
Run Script(Generate Manager Graph)
Step 11: As you can see, we have now added the connector “Get File Content using Path(For Employee PDF)” to the image below. In essence, this connector will retrieve the content of the employee’s Excel file, and the next connector will convert the generated Excel file to PDF.
Get File Content using Path(For Employee PDF)
Step 12: As you can see, the connector for converting the XLSX to PDF has been added in the image below. The Plumsail Connector is shown here. As you can see, we have chosen the content of the connector above, “Get File Content using Path(For Employee PDF)” in this document. We used Plumsail Documentation.
converting the XLSX to PDF
Step 13: As you can see, we added the connector to split the PDF in the figure below. As you can see, we have selected the connector’s content, “Convert XLSX to PDF,” for this document’s “Document Content.”

split the PDF
Step 14: Now, we’ll use the connector named “Apply to each” to receive the employee’s final report. We will include the “Create File” connector in this. The root folder path is chosen in this folder. The file name is “Employee’s Display Name_Employee’s Email ID_Report.pdf” and “Current Item” is selected in the file content, as shown in the picture below.
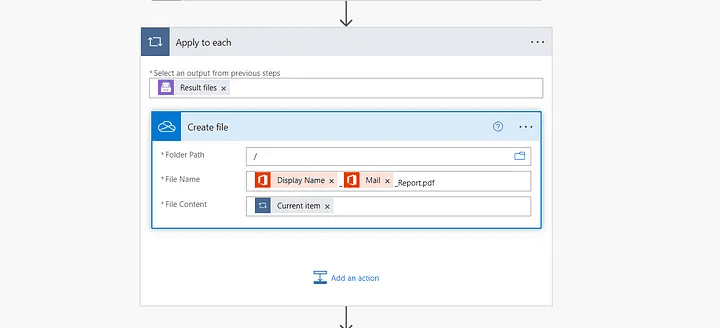
Apply to each
Step 15: This report will be mailed to the employee and the manager. As you can see in the figure below, we have therefore added the connector known as “Apply to each 2” once more. The connectors “Send an Email(v2)(Employee)” and “Send an Email(v2)(Manager)” have been added to this. We can add the Subject, body, file name, and file content to this connector.

Apply to each 2
As a result, the employee flow has ended and the self-assessment report will be sent to the employee and manager. The manager will receive a Report as well as a link to Manager’s Form following this process. The Manager must complete this form in order to receive the consolidated report. Therefore, after submitting the form, we will observe how Microsoft Power Automate generates the Consolidated Report.
The automated flow developed for Managers:-
Step 1: The first connector is “when a new response is submitted,” as can be seen in the image below. The form that the manager filled out, Competency Framework 1B, has been attached to this. The “Get Response Details” connector, the second connector, will gather the form’s information.

Competency Framework 1B
Step 2: Two connectors are present, as can be seen in the image below. The first one is “when a new response is submitted.” The Manager’s filled Competency Framework 1B form has been included in this. “ Get Response Details” is the second connector, and it will gather form information.
Office365 Connector
Step 3: As you can see, we have added the Excel connector, called “Get a Row,” in the figure below. The specific row of the specified competency will be received by this connector. You may see the completed information in it here.
Get a Row
Step 4: The file path is “Manager’s Display Name_Employee’s Display Name_ Employee’s Mail.xlsx” as you can see below screenshot where we have added the connector called “Get File Content using path”.

Get File Content using the path
Step 5: As you can see, we have now added the Excel connector “Run Script (Generate Employee Graph)” to the image below. We have created a script called “PutData_ Sales Operations” for this connector. After choosing this script, all of the questions will be displayed to you. We will then fill out all of the form’s questions.
Run Script (Generate Employee Graph)
Please take note that we will not put the FormID in this connector as we did in the Employee’s Flow.
Step 6: The file path in the image below is “Manager’s Display Name_Employee’s Display NameEmployee’s Mail.xlsx,” as you can see. We have added the connector “Get File Content using path 3” to the image.

Get File Content using path 3
Step 7: As you can see, the connector for converting the XLSX to PDF has been added in the image below. The Plumsail Connector is shown here. As you can see, we chose the content of the connector above, “Get File Content using path 3,” for this document.
converting the XLSX to PDF
Step 8: As you can see, we added the connector to split the PDF in the figure below. As you can see, we have chosen the connector’s content, “Convert XLSX to PDF,” for this document named “Document Content.”

split the PDF
Step 9: We will now use the connector named “Apply to each” to obtain the consolidated report of Employees. We will add the “Create File” connector to this. The root of the folder path is chosen, the file name is “Employee’s Display Name_Employee’s Email ID Consolidated Report.pdf,” and the “Current Item” option is chosen in the file content. As shown in the picture below.
Apply to each
Step 10: We will now mail this consolidated report to the employee and manager. As you can see in the picture below, we have therefore added the connector known as “Apply to each 2” once more. The connectors “Send an Email(v2) (Employee)” and “Send an Email(v2) (Manager)” have been added to this. We can add the Subject, body, file name, and file content to this connector.
Mail this consolidated report to the employee and manager
The Final Consolidated Report will therefore be available in Power Automate Flow in this manner. Thus, this was a step-by-step explanation of how this flow worked. When adding the email flow, we can add the Subject, body, file name, and file content to the connector as per your convenience.
I hope this article was informative and provided you with the details you required. If you have any questions while reading the blog, message me on Instagram or LinkedIn.For any work related to Automation , Power Automate Development you can contact me at helpmeanubhav@gmail.com . Special credits to my team member — Atharva, Divyam and Krisha.
Thank You…
We will learn to build a power automate flow to create a competency tool that will send a consolidated report once an employee fills out a form.
Automation
Contents:
Form 1 — Filled by Employees
Form 2 — Filled by Management
Microsoft Power Automate (formerly known as “Flow”) is a cloud-based service that allows users to create workflows themselves. Recurring routine tasks and processes in different programs/services can thus be automated. This makes working easier and more efficient. Until now, mapping and automating business processes were often only possible through programming. There were no standardized IT connectors. So far, workflows could only be realized with the SharePoint Designer within the Office environment. Microsoft Power Automate has solved this problem very well.
Step by Step flow :
Step 1: Our flow will trigger when the employee submits his or her self-assessment form. There are two connectors, the first of which is “when a new response is submitted,” as you can see in the figure below. We have included the form that the employee filled out in this. The second connector, “Get Response Details,” will gather the form’s information.
Competency Framework_1A
Step 2: As you can see in the image below, we have used an Office365 connector. The first connector is for Employee and will take the employee’s email address. The second connector is for the Manager and will take the manager’s email address. (Note: The employee’s and manager’s entries in that form are where the email address came from.)
Office365 Connector
Step 3: As you can see in the screenshot below, the connector for employees is called “Get File Content (Employee)”. And for this, we made the corresponding excel file. Therefore, we have selected this excel file for this.
File Content
Step 4: The connector labeled “Create File (Employee Copy)” in the figure below will create a copy of the employee response’s excel file, and we have titled this file “Employee’s Display Name_Employee’s Email.xlsx.” We selected the root path for the folder path, and the “Get File Content (Employee)” connector’s content was selected for the file content part.
Create File(Employee Copy)
Step 5: Now, as you can see in the graphic below, we will perform the same actions for the Manager as an employee. First, we’ll construct a connector called “Get File Content (Manager)”; within this, we’ll choose the spreadsheet we made for the Manager.
The “Create File (Manager Copy)” connector will then be added.
The root is located in this folder. The file has the following names: “Manager’s Display name_ Employee’s Display name_ Employee’s Email ID.xlsx” and its content is “Get File Content (Manager)” from the connector mentioned above.
File Content
Create File (Manager Copy)
Step 6: As you can see, we have added the Excel connector, called “Get a Row,” in the figure below. The specific row of the specified competency will be received by this connector. You may see the completed information in it here.
Get a Row
Step 7: As you can see in the screenshot below, we have added a connector called “Get File Content using path(Employee Excel)” where the file path is “Employee’s Display Name Employee’s Mail.xlsx.”
Get File Content using path(Employee Excel)
Step 8: As you can see, we have now included the Excel connector “Run Script (Generate Employee Graph)” in the image below. We have created a script called “FinalScript Sales Operations” for this connector. After choosing this script, all of the questions will be displayed to you. We will then fill out all of the form’s questions. And after that, we’ll choose the FormID for “Get a row.”
Run Script (Generate Employee Graph)
Step 9: Now that we have added the connector titled “Get File Content using path(Manager Excel),” you can see that the file path is “Manager’s Display Name_Employee’s Display Name_Employee’s Mail.xlsx” in the image below.
Get File Content using path(Manager Excel)
Step 10: As you can see, we have added the Excel connector “Run Script(Generate Manager Graph)” in the image below. We have created a script called “1A_PutData” for this connector. After choosing this script, all of the questions will be displayed to you. We will then fill out all of the form’s questions.
And after that, we’ll choose the FormID of “Get a row.”
The purpose of this run script is to display the graph in Manager’s Excel exactly as it appears on the employee’s graph.
Run Script(Generate Manager Graph)
Step 11: As you can see, we have now added the connector “Get File Content using Path(For Employee PDF)” to the image below. In essence, this connector will retrieve the content of the employee’s Excel file, and the next connector will convert the generated Excel file to PDF.
Get File Content using Path(For Employee PDF)
Step 12: As you can see, the connector for converting the XLSX to PDF has been added in the image below. The Plumsail Connector is shown here. As you can see, we have chosen the content of the connector above, “Get File Content using Path(For Employee PDF)” in this document. We used Plumsail Documentation.
converting the XLSX to PDF
Step 13: As you can see, we added the connector to split the PDF in the figure below. As you can see, we have selected the connector’s content, “Convert XLSX to PDF,” for this document’s “Document Content.”
split the PDF
Step 14: Now, we’ll use the connector named “Apply to each” to receive the employee’s final report. We will include the “Create File” connector in this. The root folder path is chosen in this folder. The file name is “Employee’s Display Name_Employee’s Email ID_Report.pdf” and “Current Item” is selected in the file content, as shown in the picture below.
Apply to each
Step 15: This report will be mailed to the employee and the manager. As you can see in the figure below, we have therefore added the connector known as “Apply to each 2” once more. The connectors “Send an Email(v2)(Employee)” and “Send an Email(v2)(Manager)” have been added to this. We can add the Subject, body, file name, and file content to this connector.
Apply to each 2
As a result, the employee flow has ended and the self-assessment report will be sent to the employee and manager. The manager will receive a Report as well as a link to Manager’s Form following this process. The Manager must complete this form in order to receive the consolidated report. Therefore, after submitting the form, we will observe how Microsoft Power Automate generates the Consolidated Report.
The automated flow developed for Managers:-
Step 1: The first connector is “when a new response is submitted,” as can be seen in the image below. The form that the manager filled out, Competency Framework 1B, has been attached to this. The “Get Response Details” connector, the second connector, will gather the form’s information.
Competency Framework 1B
Step 2: Two connectors are present, as can be seen in the image below. The first one is “when a new response is submitted.” The Manager’s filled Competency Framework 1B form has been included in this. “ Get Response Details” is the second connector, and it will gather form information.
Office365 Connector
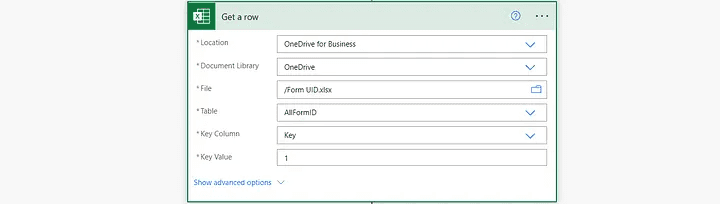
Step 3: As you can see, we have added the Excel connector, called “Get a Row,” in the figure below. The specific row of the specified competency will be received by this connector. You may see the completed information in it here.
Get a Row
Step 4: The file path is “Manager’s Display Name_Employee’s Display Name_ Employee’s Mail.xlsx” as you can see below screenshot where we have added the connector called “Get File Content using path”.
Get File Content using the path
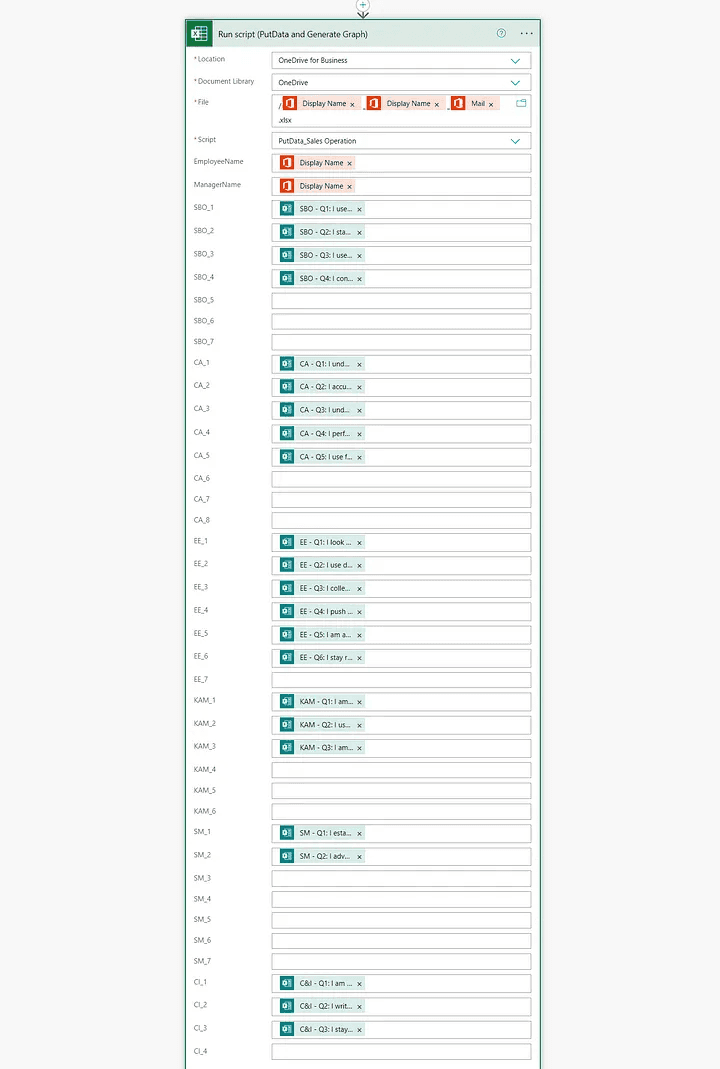
Step 5: As you can see, we have now added the Excel connector “Run Script (Generate Employee Graph)” to the image below. We have created a script called “PutData_ Sales Operations” for this connector. After choosing this script, all of the questions will be displayed to you. We will then fill out all of the form’s questions.
Run Script (Generate Employee Graph)
Please take note that we will not put the FormID in this connector as we did in the Employee’s Flow.
Step 6: The file path in the image below is “Manager’s Display Name_Employee’s Display NameEmployee’s Mail.xlsx,” as you can see. We have added the connector “Get File Content using path 3” to the image.
Get File Content using path 3
Step 7: As you can see, the connector for converting the XLSX to PDF has been added in the image below. The Plumsail Connector is shown here. As you can see, we chose the content of the connector above, “Get File Content using path 3,” for this document.
converting the XLSX to PDF
Step 8: As you can see, we added the connector to split the PDF in the figure below. As you can see, we have chosen the connector’s content, “Convert XLSX to PDF,” for this document named “Document Content.”
split the PDF
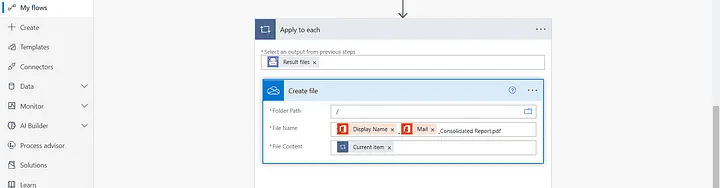
Step 9: We will now use the connector named “Apply to each” to obtain the consolidated report of Employees. We will add the “Create File” connector to this. The root of the folder path is chosen, the file name is “Employee’s Display Name_Employee’s Email ID Consolidated Report.pdf,” and the “Current Item” option is chosen in the file content. As shown in the picture below.
Apply to each
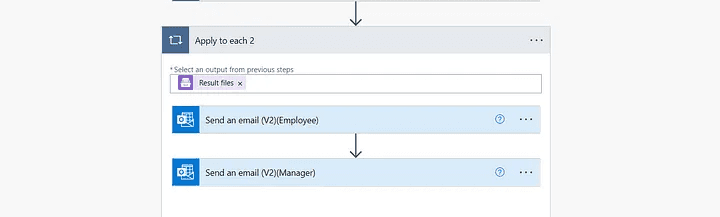
Step 10: We will now mail this consolidated report to the employee and manager. As you can see in the picture below, we have therefore added the connector known as “Apply to each 2” once more. The connectors “Send an Email(v2) (Employee)” and “Send an Email(v2) (Manager)” have been added to this. We can add the Subject, body, file name, and file content to this connector.
Mail this consolidated report to the employee and manager
The Final Consolidated Report will therefore be available in Power Automate Flow in this manner. Thus, this was a step-by-step explanation of how this flow worked. When adding the email flow, we can add the Subject, body, file name, and file content to the connector as per your convenience.
I hope this article was informative and provided you with the details you required. If you have any questions while reading the blog, message me on Instagram or LinkedIn.For any work related to Automation , Power Automate Development you can contact me at helpmeanubhav@gmail.com . Special credits to my team member — Atharva, Divyam and Krisha.
Thank You…
We will learn to build a power automate flow to create a competency tool that will send a consolidated report once an employee fills out a form.
Automation
Contents:
Form 1 — Filled by Employees
Form 2 — Filled by Management
Microsoft Power Automate (formerly known as “Flow”) is a cloud-based service that allows users to create workflows themselves. Recurring routine tasks and processes in different programs/services can thus be automated. This makes working easier and more efficient. Until now, mapping and automating business processes were often only possible through programming. There were no standardized IT connectors. So far, workflows could only be realized with the SharePoint Designer within the Office environment. Microsoft Power Automate has solved this problem very well.
Step by Step flow :
Step 1: Our flow will trigger when the employee submits his or her self-assessment form. There are two connectors, the first of which is “when a new response is submitted,” as you can see in the figure below. We have included the form that the employee filled out in this. The second connector, “Get Response Details,” will gather the form’s information.
Competency Framework_1A
Step 2: As you can see in the image below, we have used an Office365 connector. The first connector is for Employee and will take the employee’s email address. The second connector is for the Manager and will take the manager’s email address. (Note: The employee’s and manager’s entries in that form are where the email address came from.)
Office365 Connector
Step 3: As you can see in the screenshot below, the connector for employees is called “Get File Content (Employee)”. And for this, we made the corresponding excel file. Therefore, we have selected this excel file for this.
File Content
Step 4: The connector labeled “Create File (Employee Copy)” in the figure below will create a copy of the employee response’s excel file, and we have titled this file “Employee’s Display Name_Employee’s Email.xlsx.” We selected the root path for the folder path, and the “Get File Content (Employee)” connector’s content was selected for the file content part.
Create File(Employee Copy)
Step 5: Now, as you can see in the graphic below, we will perform the same actions for the Manager as an employee. First, we’ll construct a connector called “Get File Content (Manager)”; within this, we’ll choose the spreadsheet we made for the Manager.
The “Create File (Manager Copy)” connector will then be added.
The root is located in this folder. The file has the following names: “Manager’s Display name_ Employee’s Display name_ Employee’s Email ID.xlsx” and its content is “Get File Content (Manager)” from the connector mentioned above.
File Content
Create File (Manager Copy)
Step 6: As you can see, we have added the Excel connector, called “Get a Row,” in the figure below. The specific row of the specified competency will be received by this connector. You may see the completed information in it here.
Get a Row
Step 7: As you can see in the screenshot below, we have added a connector called “Get File Content using path(Employee Excel)” where the file path is “Employee’s Display Name Employee’s Mail.xlsx.”
Get File Content using path(Employee Excel)
Step 8: As you can see, we have now included the Excel connector “Run Script (Generate Employee Graph)” in the image below. We have created a script called “FinalScript Sales Operations” for this connector. After choosing this script, all of the questions will be displayed to you. We will then fill out all of the form’s questions. And after that, we’ll choose the FormID for “Get a row.”
Run Script (Generate Employee Graph)
Step 9: Now that we have added the connector titled “Get File Content using path(Manager Excel),” you can see that the file path is “Manager’s Display Name_Employee’s Display Name_Employee’s Mail.xlsx” in the image below.
Get File Content using path(Manager Excel)
Step 10: As you can see, we have added the Excel connector “Run Script(Generate Manager Graph)” in the image below. We have created a script called “1A_PutData” for this connector. After choosing this script, all of the questions will be displayed to you. We will then fill out all of the form’s questions.
And after that, we’ll choose the FormID of “Get a row.”
The purpose of this run script is to display the graph in Manager’s Excel exactly as it appears on the employee’s graph.
Run Script(Generate Manager Graph)
Step 11: As you can see, we have now added the connector “Get File Content using Path(For Employee PDF)” to the image below. In essence, this connector will retrieve the content of the employee’s Excel file, and the next connector will convert the generated Excel file to PDF.
Get File Content using Path(For Employee PDF)
Step 12: As you can see, the connector for converting the XLSX to PDF has been added in the image below. The Plumsail Connector is shown here. As you can see, we have chosen the content of the connector above, “Get File Content using Path(For Employee PDF)” in this document. We used Plumsail Documentation.
converting the XLSX to PDF
Step 13: As you can see, we added the connector to split the PDF in the figure below. As you can see, we have selected the connector’s content, “Convert XLSX to PDF,” for this document’s “Document Content.”
split the PDF
Step 14: Now, we’ll use the connector named “Apply to each” to receive the employee’s final report. We will include the “Create File” connector in this. The root folder path is chosen in this folder. The file name is “Employee’s Display Name_Employee’s Email ID_Report.pdf” and “Current Item” is selected in the file content, as shown in the picture below.
Apply to each
Step 15: This report will be mailed to the employee and the manager. As you can see in the figure below, we have therefore added the connector known as “Apply to each 2” once more. The connectors “Send an Email(v2)(Employee)” and “Send an Email(v2)(Manager)” have been added to this. We can add the Subject, body, file name, and file content to this connector.
Apply to each 2
As a result, the employee flow has ended and the self-assessment report will be sent to the employee and manager. The manager will receive a Report as well as a link to Manager’s Form following this process. The Manager must complete this form in order to receive the consolidated report. Therefore, after submitting the form, we will observe how Microsoft Power Automate generates the Consolidated Report.
The automated flow developed for Managers:-
Step 1: The first connector is “when a new response is submitted,” as can be seen in the image below. The form that the manager filled out, Competency Framework 1B, has been attached to this. The “Get Response Details” connector, the second connector, will gather the form’s information.
Competency Framework 1B
Step 2: Two connectors are present, as can be seen in the image below. The first one is “when a new response is submitted.” The Manager’s filled Competency Framework 1B form has been included in this. “ Get Response Details” is the second connector, and it will gather form information.
Office365 Connector
Step 3: As you can see, we have added the Excel connector, called “Get a Row,” in the figure below. The specific row of the specified competency will be received by this connector. You may see the completed information in it here.
Get a Row
Step 4: The file path is “Manager’s Display Name_Employee’s Display Name_ Employee’s Mail.xlsx” as you can see below screenshot where we have added the connector called “Get File Content using path”.
Get File Content using the path
Step 5: As you can see, we have now added the Excel connector “Run Script (Generate Employee Graph)” to the image below. We have created a script called “PutData_ Sales Operations” for this connector. After choosing this script, all of the questions will be displayed to you. We will then fill out all of the form’s questions.
Run Script (Generate Employee Graph)
Please take note that we will not put the FormID in this connector as we did in the Employee’s Flow.
Step 6: The file path in the image below is “Manager’s Display Name_Employee’s Display NameEmployee’s Mail.xlsx,” as you can see. We have added the connector “Get File Content using path 3” to the image.
Get File Content using path 3
Step 7: As you can see, the connector for converting the XLSX to PDF has been added in the image below. The Plumsail Connector is shown here. As you can see, we chose the content of the connector above, “Get File Content using path 3,” for this document.
converting the XLSX to PDF
Step 8: As you can see, we added the connector to split the PDF in the figure below. As you can see, we have chosen the connector’s content, “Convert XLSX to PDF,” for this document named “Document Content.”
split the PDF
Step 9: We will now use the connector named “Apply to each” to obtain the consolidated report of Employees. We will add the “Create File” connector to this. The root of the folder path is chosen, the file name is “Employee’s Display Name_Employee’s Email ID Consolidated Report.pdf,” and the “Current Item” option is chosen in the file content. As shown in the picture below.
Apply to each
Step 10: We will now mail this consolidated report to the employee and manager. As you can see in the picture below, we have therefore added the connector known as “Apply to each 2” once more. The connectors “Send an Email(v2) (Employee)” and “Send an Email(v2) (Manager)” have been added to this. We can add the Subject, body, file name, and file content to this connector.
Mail this consolidated report to the employee and manager
The Final Consolidated Report will therefore be available in Power Automate Flow in this manner. Thus, this was a step-by-step explanation of how this flow worked. When adding the email flow, we can add the Subject, body, file name, and file content to the connector as per your convenience.
I hope this article was informative and provided you with the details you required. If you have any questions while reading the blog, message me on Instagram or LinkedIn.For any work related to Automation , Power Automate Development you can contact me at helpmeanubhav@gmail.com . Special credits to my team member — Atharva, Divyam and Krisha.
Thank You…