SonarQube integration with Azure DevOps and Code Scanning via Service Connections
SonarQube’s integration with Azure DevOps Server allows you to maintain code quality and security in your Azure DevOps Server repositories.
About Sonarqube
With this integration, we will be able to:
Import our Azure DevOps repositories into SonarQube so that we can easily set up SonarQube projects and analyze projects with Azure Pipelines, analysis into the build pipeline.
Allow us to easily create SonarQube projects from the Azure DevOps Server repositories. This is also the first step in adding pull request decoration.
The builtin SonarScanners running in Azure Pipelines jobs can automatically detect branches or pull requests being made, so we do not need to specifically pass them as parameters to the scanner (branch and pull request analysis is available starting in Developer Edition.
Also we will be able to see our Quality Gate and code metric results right in Azure DevOps so that it is safe to merge the changes.
Setup
Prerequisites
SonarQube integration with Azure DevOps server requires at least Azure DevOps Server 2019, TFS 2018, or TFS 2017 Update 2+.
Import Azure DevOps repositories
To set up the import of Azure DevOps repositories:
Set your global settings:
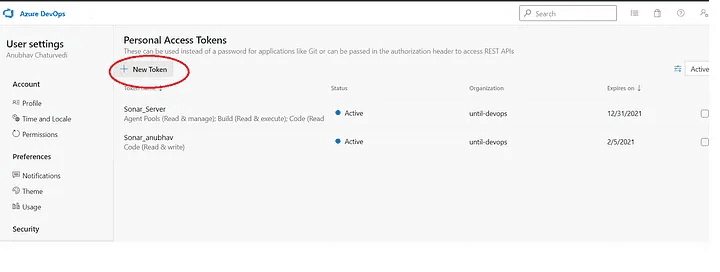
Go to the Azure DevOps Portal and add the PAT(Personal Access Token), as shown in the below screenshot.
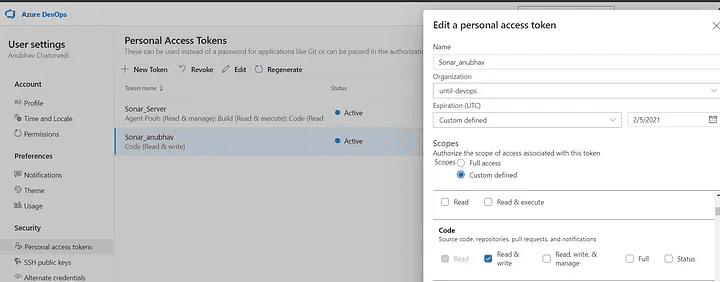
Add the new token as shown in the below pic:
Select the custom defined Scope and give access to Reading and writing of the code.
This personal access token is used for pull request decoration, and we’ll be asked for another personal access token for importing projects in the following section.
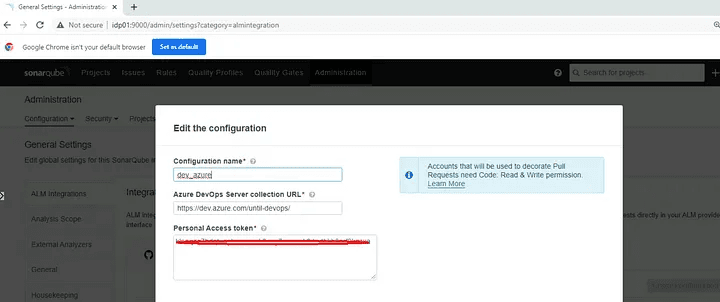
Provide a personal access token with Code (Read & Write) scope so SonarQube can access and list your Azure DevOps Server projects. This token will be stored in SonarQube and can be revoked at anytime in Azure DevOps Server.
To refer to the SonarQube installation on a Linux Machine via Docker just refer to this link.
Integration Configuration
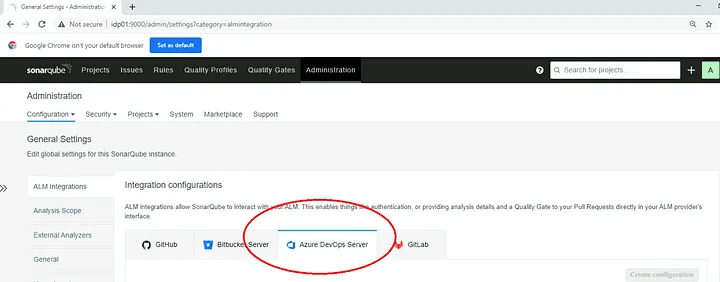
To import your Azure DevOps repositories into SonarQube, you need to first set your global SonarQube settings. Navigate to Administration > Configuration > General Settings > ALM Integrations, select the Azure DevOps tab, and click the Create configuration button. Specify the following settings:
Just click on “Create Configuration” and fill in the relevant details:
Add a personal access token for importing repositories
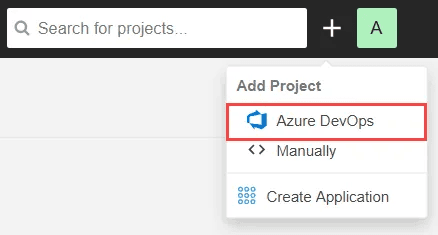
You should be able to see the Azure DevOps option after setting these global settings. You can add a project from Azure DevOps Server by clicking the “+” in the upper-right corner and selecting Azure DevOps:
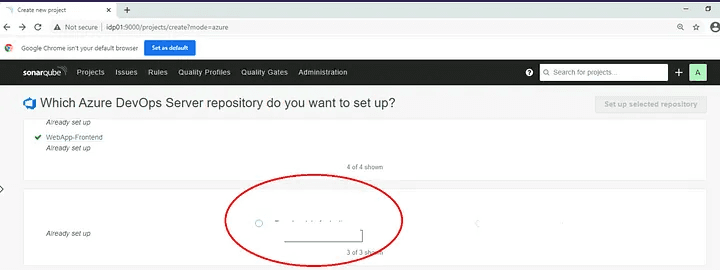
Select the repository that you want to setup, from the listed ones:

Adding the repository in SonarQube Scanner
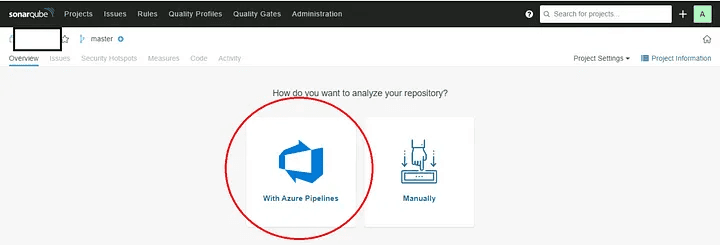
2)Just Select the repository you want to scan with the SonarQube and click upon “Get Started”
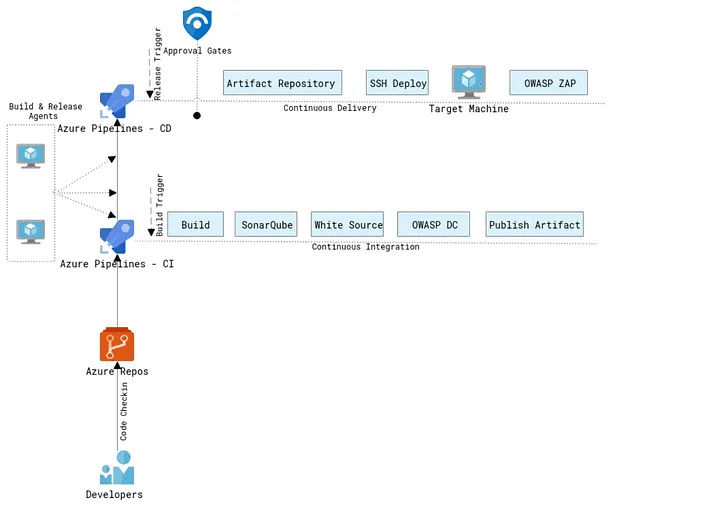
Integrating Pipelines
3)Once selected just click upon “With Azure Pipelines”
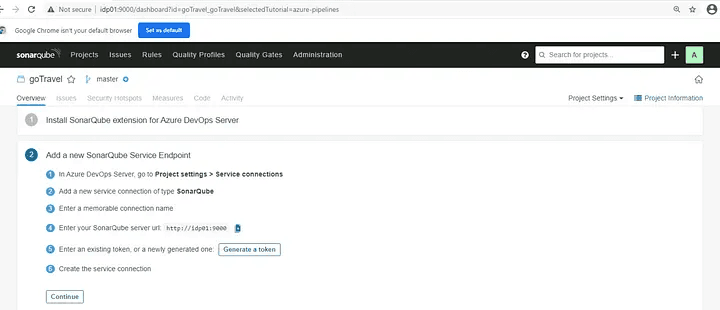
4)Just follow the guideline by installing the SonarQube extension
What is Service Connection ?
In order to help our pipeline communicate with the SonarQube running on an external or remote host to execute tasks in a job we will use the concept of Service Connections.
They might be used connect to your Microsoft Azure subscription, to a different build server or file server, to an online continuous integration environment, or to services you install on remote computers.
It’s possible to define service connections in Azure Pipelines that are available for use in all your tasks. For example, you can create a service connection for your Azure subscription and use this service connection name in an Azure Web Site Deployment task in a release pipeline.
Configuring Service Connections
Lets see how to configure service connections to connect with SonarQube:
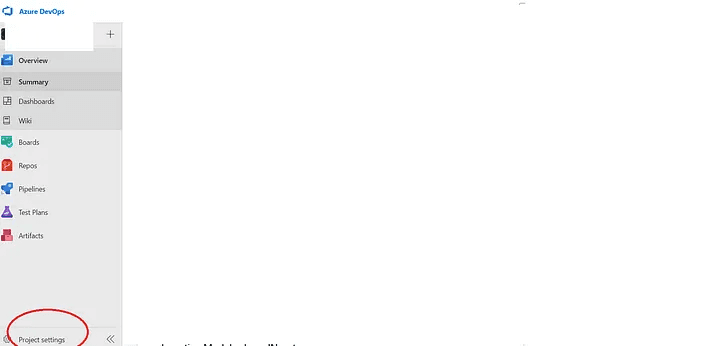
1)We will go into the project , and below left option click upon the “Project Settings”.
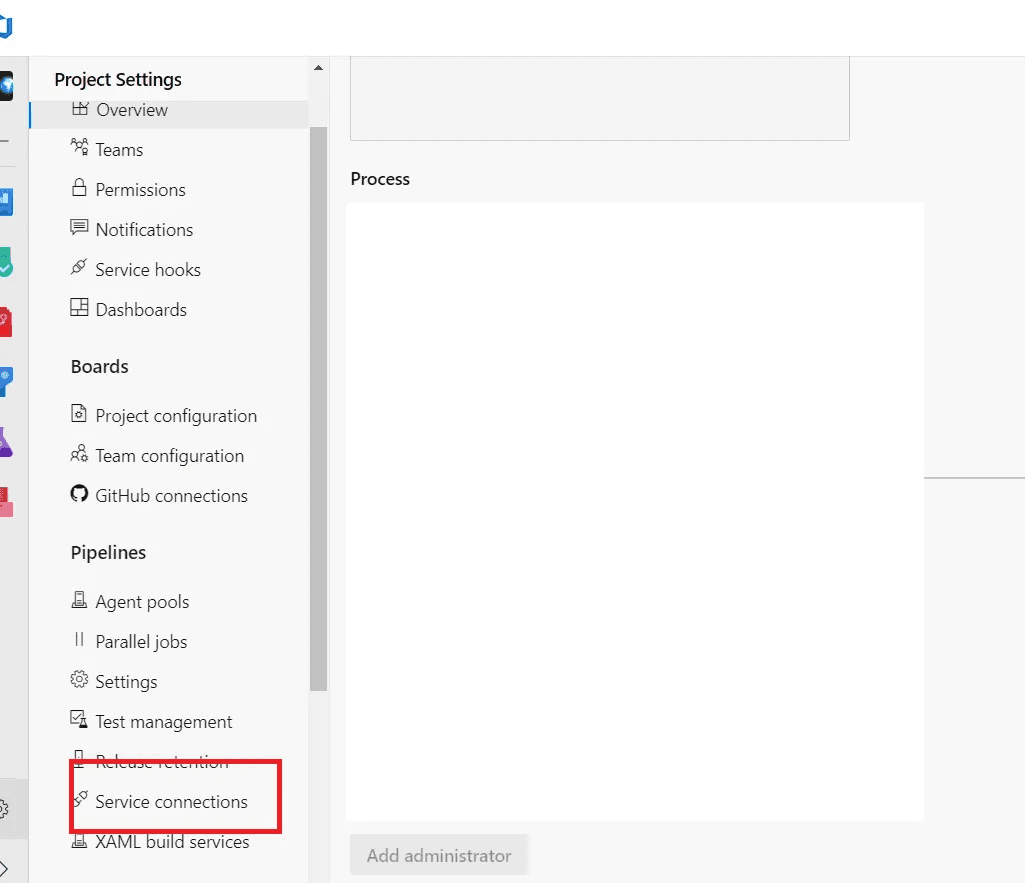
2)In the left pane (Project Settings),in the “Pipelines” section click upon the “Service Connections”.
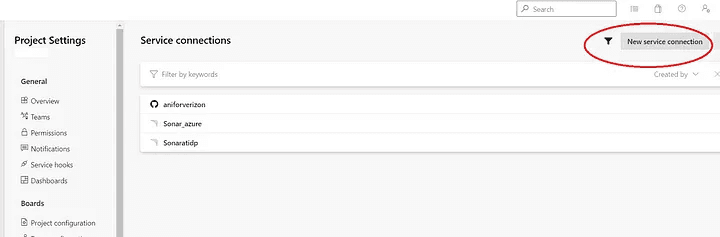
3)On the top right side click upon the “New Service Connection” button.
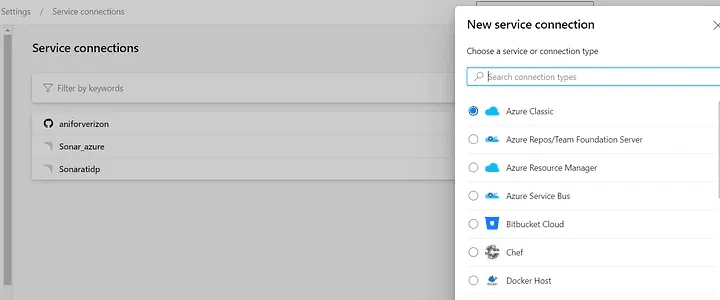
4)Just search for “SonarQube” opened menu.
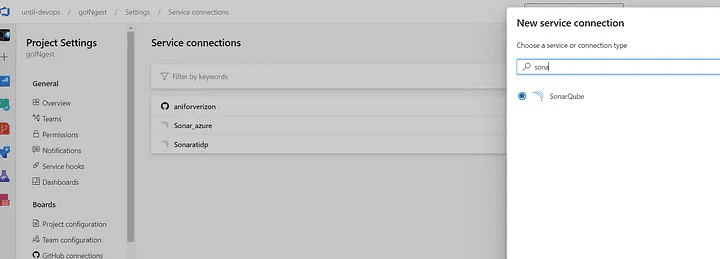
Click upon next on the right side down of the menu.
5)You will enter into another menu which asks for inputs for ServerUrl and Tokens:
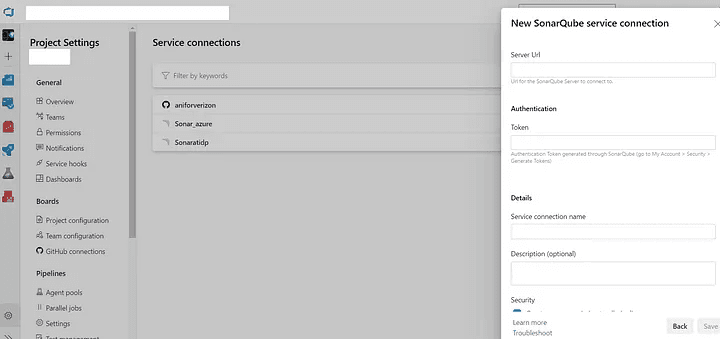
just fill these relevant values from the machine on which you have installed SonarQube:

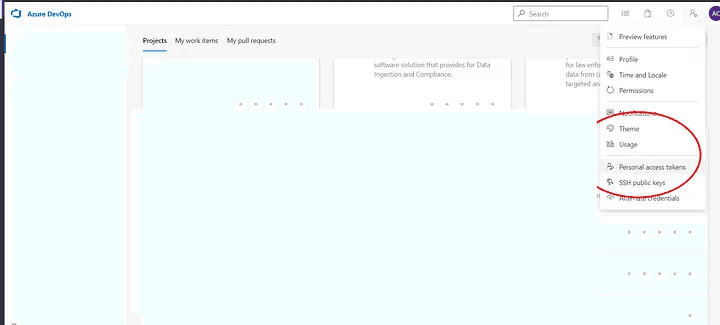
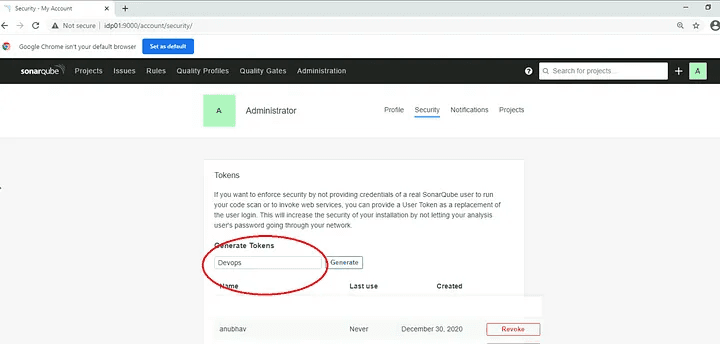
Just click on the top right and go into My Account menu item.
In the Security Tab ,just give a name to the token and press generate.
6)Fill the details about your Server URL and also enter the generated token value and give a name the connection service.

Adding the relevant frontend or backend stack
5)Depending upon the stack used (For example: .NET) just create your pipeline

Final Pipeline should look like this :
In the Agent job make sure that you are adding the Agent pool that you have already added, or add a new one by following this procedure .
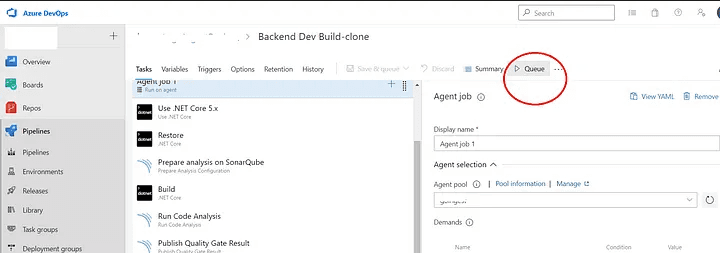
Running the Pipeline
6)Once the pipeline is setup end to end, just press upon Queue to run the pipeline:
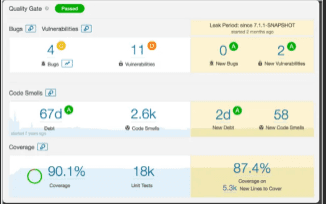
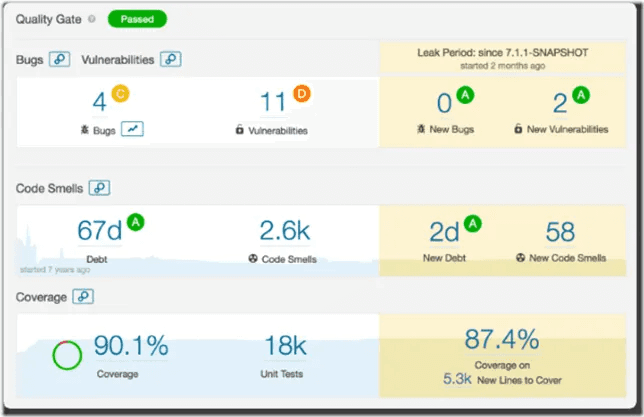
Observing the final results in SonarQube
7)You can see your results in the SonarQube:
For any further Queries or anything related to DevOps or troubleshooting or specialized Azure DevOps or SonarQube you can DM me on Linkedin or instagram id=acanubhav94.
Happy Hacking !
SonarQube’s integration with Azure DevOps Server allows you to maintain code quality and security in your Azure DevOps Server repositories.
About Sonarqube
With this integration, we will be able to:
Import our Azure DevOps repositories into SonarQube so that we can easily set up SonarQube projects and analyze projects with Azure Pipelines, analysis into the build pipeline.
Allow us to easily create SonarQube projects from the Azure DevOps Server repositories. This is also the first step in adding pull request decoration.
The builtin SonarScanners running in Azure Pipelines jobs can automatically detect branches or pull requests being made, so we do not need to specifically pass them as parameters to the scanner (branch and pull request analysis is available starting in Developer Edition.
Also we will be able to see our Quality Gate and code metric results right in Azure DevOps so that it is safe to merge the changes.
Setup
Prerequisites
SonarQube integration with Azure DevOps server requires at least Azure DevOps Server 2019, TFS 2018, or TFS 2017 Update 2+.
Import Azure DevOps repositories
To set up the import of Azure DevOps repositories:
Set your global settings:
Go to the Azure DevOps Portal and add the PAT(Personal Access Token), as shown in the below screenshot.
Add the new token as shown in the below pic:
Select the custom defined Scope and give access to Reading and writing of the code.
This personal access token is used for pull request decoration, and we’ll be asked for another personal access token for importing projects in the following section.
Provide a personal access token with Code (Read & Write) scope so SonarQube can access and list your Azure DevOps Server projects. This token will be stored in SonarQube and can be revoked at anytime in Azure DevOps Server.
To refer to the SonarQube installation on a Linux Machine via Docker just refer to this link.
Integration Configuration
To import your Azure DevOps repositories into SonarQube, you need to first set your global SonarQube settings. Navigate to Administration > Configuration > General Settings > ALM Integrations, select the Azure DevOps tab, and click the Create configuration button. Specify the following settings:
Just click on “Create Configuration” and fill in the relevant details:
Add a personal access token for importing repositories
You should be able to see the Azure DevOps option after setting these global settings. You can add a project from Azure DevOps Server by clicking the “+” in the upper-right corner and selecting Azure DevOps:
Select the repository that you want to setup, from the listed ones:
Adding the repository in SonarQube Scanner
2)Just Select the repository you want to scan with the SonarQube and click upon “Get Started”
Integrating Pipelines
3)Once selected just click upon “With Azure Pipelines”
4)Just follow the guideline by installing the SonarQube extension
What is Service Connection ?
In order to help our pipeline communicate with the SonarQube running on an external or remote host to execute tasks in a job we will use the concept of Service Connections.
They might be used connect to your Microsoft Azure subscription, to a different build server or file server, to an online continuous integration environment, or to services you install on remote computers.
It’s possible to define service connections in Azure Pipelines that are available for use in all your tasks. For example, you can create a service connection for your Azure subscription and use this service connection name in an Azure Web Site Deployment task in a release pipeline.
Configuring Service Connections
Lets see how to configure service connections to connect with SonarQube:
1)We will go into the project , and below left option click upon the “Project Settings”.
2)In the left pane (Project Settings),in the “Pipelines” section click upon the “Service Connections”.
3)On the top right side click upon the “New Service Connection” button.
4)Just search for “SonarQube” opened menu.
Click upon next on the right side down of the menu.
5)You will enter into another menu which asks for inputs for ServerUrl and Tokens:
just fill these relevant values from the machine on which you have installed SonarQube:
Just click on the top right and go into My Account menu item.
In the Security Tab ,just give a name to the token and press generate.
6)Fill the details about your Server URL and also enter the generated token value and give a name the connection service.
Adding the relevant frontend or backend stack
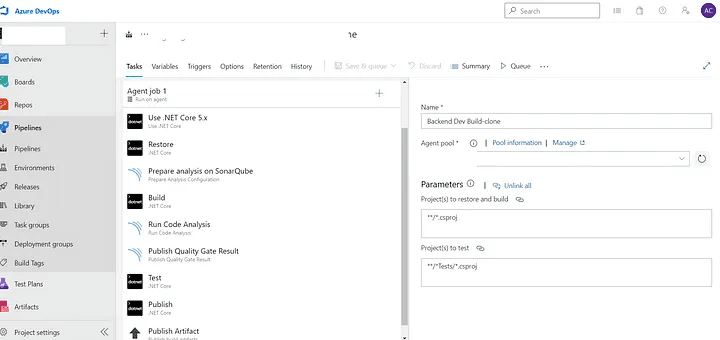
5)Depending upon the stack used (For example: .NET) just create your pipeline
Final Pipeline should look like this :
In the Agent job make sure that you are adding the Agent pool that you have already added, or add a new one by following this procedure .
Running the Pipeline
6)Once the pipeline is setup end to end, just press upon Queue to run the pipeline:
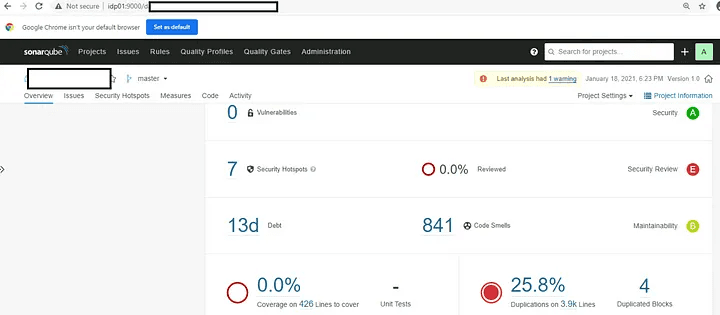
Observing the final results in SonarQube
7)You can see your results in the SonarQube:
For any further Queries or anything related to DevOps or troubleshooting or specialized Azure DevOps or SonarQube you can DM me on Linkedin or instagram id=acanubhav94.
Happy Hacking !
SonarQube’s integration with Azure DevOps Server allows you to maintain code quality and security in your Azure DevOps Server repositories.
About Sonarqube
With this integration, we will be able to:
Import our Azure DevOps repositories into SonarQube so that we can easily set up SonarQube projects and analyze projects with Azure Pipelines, analysis into the build pipeline.
Allow us to easily create SonarQube projects from the Azure DevOps Server repositories. This is also the first step in adding pull request decoration.
The builtin SonarScanners running in Azure Pipelines jobs can automatically detect branches or pull requests being made, so we do not need to specifically pass them as parameters to the scanner (branch and pull request analysis is available starting in Developer Edition.
Also we will be able to see our Quality Gate and code metric results right in Azure DevOps so that it is safe to merge the changes.
Setup
Prerequisites
SonarQube integration with Azure DevOps server requires at least Azure DevOps Server 2019, TFS 2018, or TFS 2017 Update 2+.
Import Azure DevOps repositories
To set up the import of Azure DevOps repositories:
Set your global settings:
Go to the Azure DevOps Portal and add the PAT(Personal Access Token), as shown in the below screenshot.
Add the new token as shown in the below pic:
Select the custom defined Scope and give access to Reading and writing of the code.
This personal access token is used for pull request decoration, and we’ll be asked for another personal access token for importing projects in the following section.
Provide a personal access token with Code (Read & Write) scope so SonarQube can access and list your Azure DevOps Server projects. This token will be stored in SonarQube and can be revoked at anytime in Azure DevOps Server.
To refer to the SonarQube installation on a Linux Machine via Docker just refer to this link.
Integration Configuration
To import your Azure DevOps repositories into SonarQube, you need to first set your global SonarQube settings. Navigate to Administration > Configuration > General Settings > ALM Integrations, select the Azure DevOps tab, and click the Create configuration button. Specify the following settings:
Just click on “Create Configuration” and fill in the relevant details:
Add a personal access token for importing repositories
You should be able to see the Azure DevOps option after setting these global settings. You can add a project from Azure DevOps Server by clicking the “+” in the upper-right corner and selecting Azure DevOps:
Select the repository that you want to setup, from the listed ones:
Adding the repository in SonarQube Scanner
2)Just Select the repository you want to scan with the SonarQube and click upon “Get Started”
Integrating Pipelines
3)Once selected just click upon “With Azure Pipelines”
4)Just follow the guideline by installing the SonarQube extension
What is Service Connection ?
In order to help our pipeline communicate with the SonarQube running on an external or remote host to execute tasks in a job we will use the concept of Service Connections.
They might be used connect to your Microsoft Azure subscription, to a different build server or file server, to an online continuous integration environment, or to services you install on remote computers.
It’s possible to define service connections in Azure Pipelines that are available for use in all your tasks. For example, you can create a service connection for your Azure subscription and use this service connection name in an Azure Web Site Deployment task in a release pipeline.
Configuring Service Connections
Lets see how to configure service connections to connect with SonarQube:
1)We will go into the project , and below left option click upon the “Project Settings”.
2)In the left pane (Project Settings),in the “Pipelines” section click upon the “Service Connections”.
3)On the top right side click upon the “New Service Connection” button.
4)Just search for “SonarQube” opened menu.
Click upon next on the right side down of the menu.
5)You will enter into another menu which asks for inputs for ServerUrl and Tokens:
just fill these relevant values from the machine on which you have installed SonarQube:
Just click on the top right and go into My Account menu item.
In the Security Tab ,just give a name to the token and press generate.
6)Fill the details about your Server URL and also enter the generated token value and give a name the connection service.
Adding the relevant frontend or backend stack
5)Depending upon the stack used (For example: .NET) just create your pipeline
Final Pipeline should look like this :
In the Agent job make sure that you are adding the Agent pool that you have already added, or add a new one by following this procedure .
Running the Pipeline
6)Once the pipeline is setup end to end, just press upon Queue to run the pipeline:
Observing the final results in SonarQube
7)You can see your results in the SonarQube:
For any further Queries or anything related to DevOps or troubleshooting or specialized Azure DevOps or SonarQube you can DM me on Linkedin or instagram id=acanubhav94.
Happy Hacking !