
Learn how to trade on Pionex via Flashbots and Arbitrage
This blog will examine trading using pionex utilizing the digital money. So let’s examine what pionex actually is.
Contents:
Introduction
Features
Steps to Trade on Pionex
Grid Trading Bot
Pionex is a type of cryptocurrency exchange with built-in trading bots that came into prominence in 2020 and has since achieved the status of a significant and well-known exchange supported by investments in fiat currency and aggregated liquidity from the most well-known cryptocurrency exchanges online.
These bots help you to automate your investment strategy so that you don't have to constantly monitor the market. The free integrated bots offered by Pionex, which now reach a high of 16 in total, are one of the platform’s most noteworthy features.
These bots aim to speed up the procedure from registering to trading, add value to Pionex’s offer, and turn the platform into a one-stop shop for beginners in cryptocurrency trading.
The bots also simplify the trading process itself, lowering the expertise threshold and eliminating the need to sacrifice conventional jobs due to the high investment of time on the users’ part.
In order to know more about Pionex and its features, you can visit the following link:
https://earthweb.com/pionex/
Pionex Review 2022: Legit Trading Bots & Exchange or a Scam? - EarthWeb
Having a crypto exchange equipped with its own functioning crypto trading automation tools sure does simplify the…
earthweb.com
Let’s learn how to trade on Pionex by going through the stages listed below:
Visit the Pionex website and login in using your credentials. If you don’t already have an account there, register with your email or phone number. Use referral code BAKNMn0H to get started.
https://www.pionex.com/en-US/
Crypto Trading Robot | Free Crypto Trading Bot | Pionex
Your browser is not supported by Crypto Trading Robot | Free Crypto Trading Bot | Pionex. Or browse the version too…
www.pionex.com

Pionex
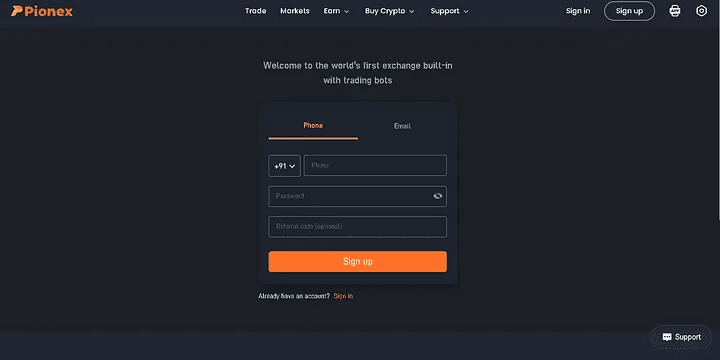
Log In
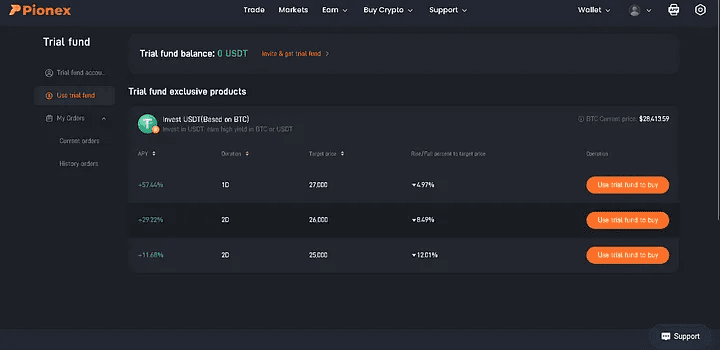
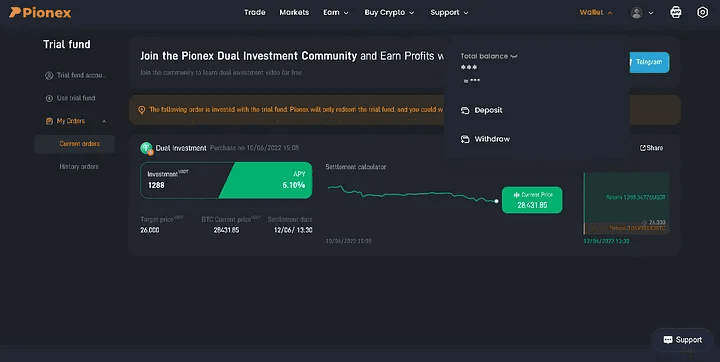
2. You will receive 1288 USDT trial money after logging in for the first time, which you may use to invest in USDT by selecting an appropriate Annual Percent Yield, Duration, Target Price, and Rise/Fall percent to the Target Price. After the Duration, Pionex will only redeem the trial fund, and you may withdraw the interest.
Wallet
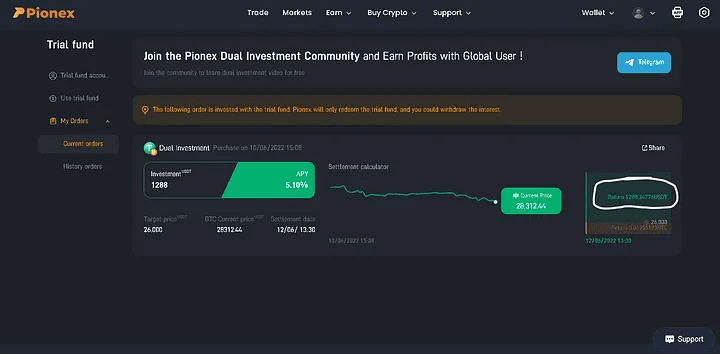
The amount highlighted above — 1288 USDT can be withdrawn or be used by you for trading itself
3. When we’re finished using the trial funds, we use the Deposit button, which is located under the Wallet dropdown, to deposit real money into our Pionex Account.
Click the Deposit Button
4. You can put whatever coins or tokens you like here; USDT is the default setting. You may choose the token or coin of your choosing by clicking on the USDT menu as shown below.
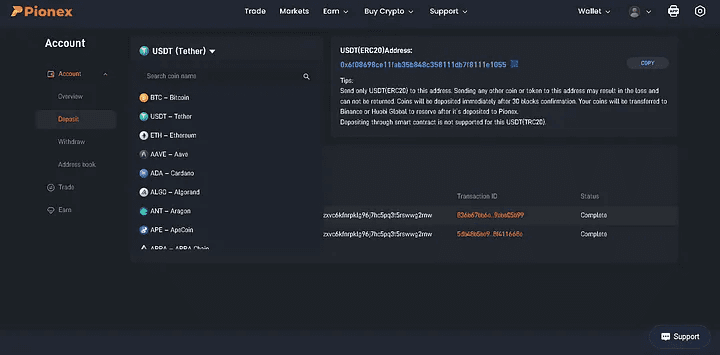
USDT Menu
5. I’ll use the BNB Smart Chain Coin as an example. Since BNB Smart Chain is being utilized in this instance for cryptocurrency trading, we choose BEP2 after selecting BNB Coin from the menu. Be cautious while selecting the appropriate token format.
For instance, if you’re sending an ERC-20 USDT token to your wallet and adding USDT, make sure it is in the ERC-20 format. (If you transfer any additional tokens or coins to this address, they won’t be added to your wallet and you risk losing them. The public address that is displayed below may be used to send tokens to our Pionex account or we can scan the QR code.
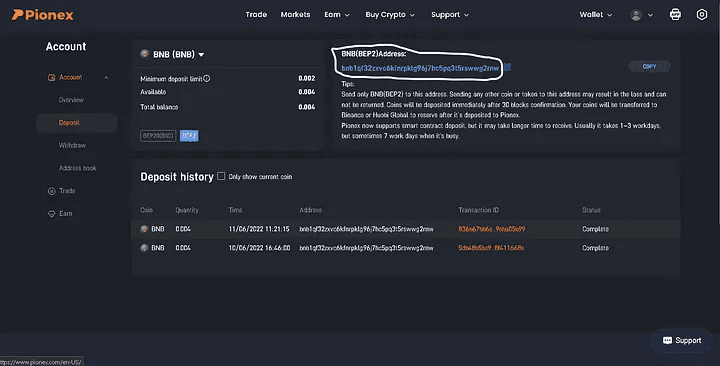
Chose BNB Smart Coin
After you transfer funds from your Crypto Exchange Wallet to your Pionex Wallet, the transaction status will show completed and your tokens/coins will be reflected in your Deposit history as can be seen above.
6. After adding money to our Pionex Wallet, let’s go on to trading, which is the most exciting aspect. To examine your trading account balance and portfolio, click the Trade tab on the left after selecting it from the top menu.
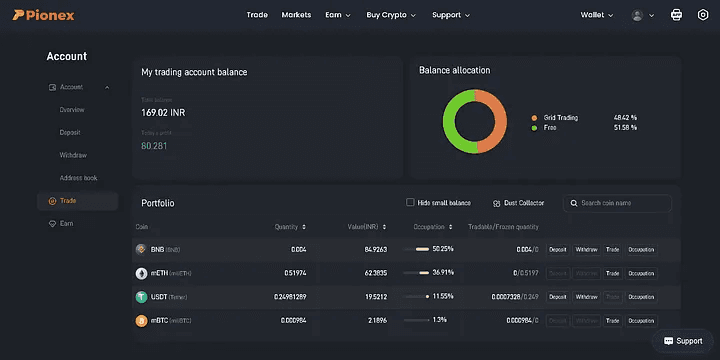
My trading account balance
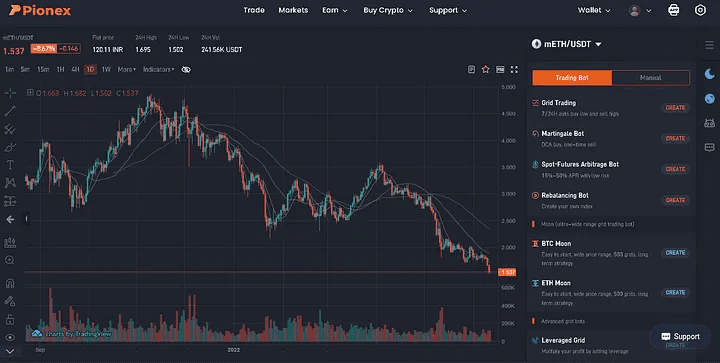
7. After clicking on the Trade tab on the top you’ll see a lot of bots available and trading cryptocurrencies. Since we had added BNB tokens to our wallet we select the BNB token as our quote currency by clicking on the dropdown mETH/USDT in this example.
mETH/USDT
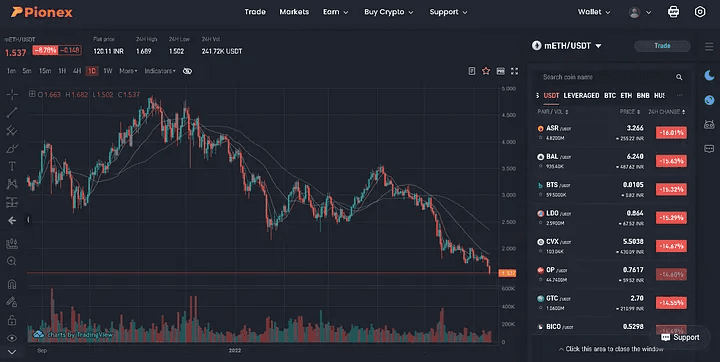
After clicking on our quote currency, we’ll see the trading pair that is available for our quote currency, this pair is the base currency that will be used in the trading. For our example, we only have MATIC as the only option available as the base currency, and let's say I’m not interested in trading in MATIC coins, so for this what we do is we trade our BNB coin with another coin that has much more base currency options. Let’s go with USDT in this case.
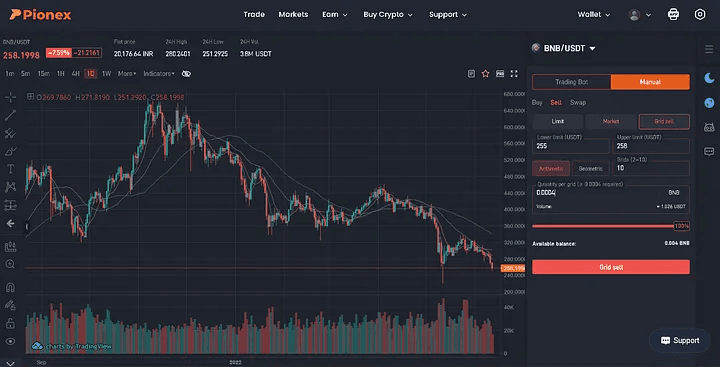
8. So, what we do now is that first, we select BNB/USDT, then we go to Manual trading to sell our BNB coins for getting some USDT coins. Here you can choose Grid sell or Limit or Market sell your BNB coins as per your choice.
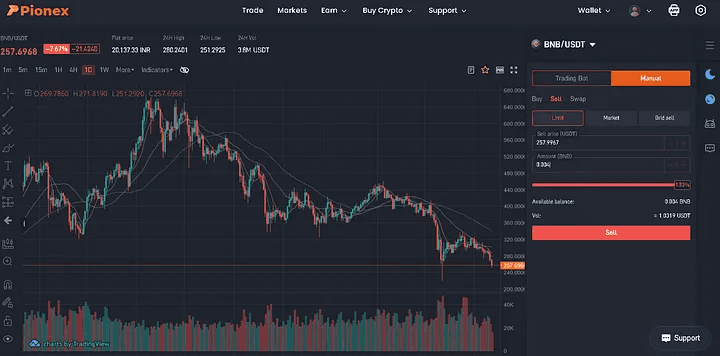
Grid sell or Limit or Market sell
9. You’ll receive a message confirming the transaction, so let’s go create some bots after earning some USDT. You then go to Trade and choose the base currency of your choosing and USDT as the quote currency. (If you wish to experiment, the least number of USDT coins needed to create a trading bot is with mBTC and mETH, which is what I’ll be using in this demonstration.) And a display similar to the one below will appear:
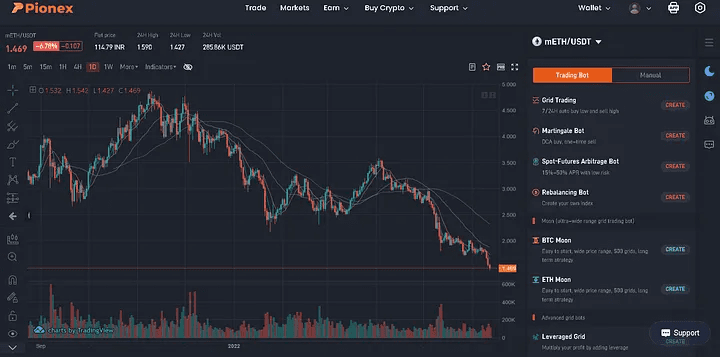
10. Now you need to decide whatever bot you want to build and make sure you meet the minimum expenditure requirement for a bot. Let’s say we decide to construct a Grid Trading Bot. When we click the create button, something like this shows up on our screen.
The next step is to choose the bot you want to build and make sure you meet the minimum cost requirement. Imagine we decide to construct a Grid Trading Bot. When we click on create, something like this displays on our screen.
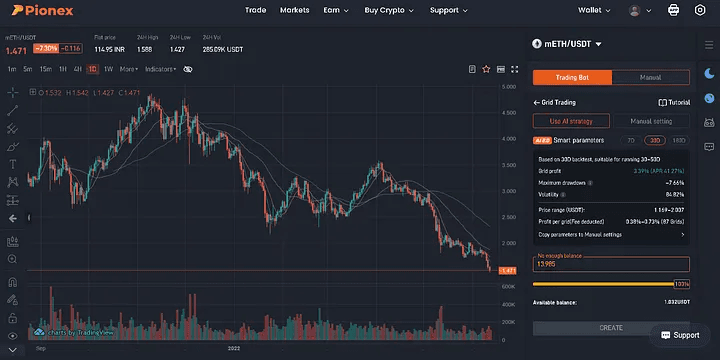
The AI-use approach, A set of parameters will be recommended to you by Pionex AI Advisor. The parameters were determined by backtesting the previous seven days. As a preview, you’ll see the suggested Price Range and Profit Per Grid. To determine how much of your dollars to utilize, all you have to do is move the slider. regarding the Grid Trading Bot. Once you’ve finished, just click CREATE to have the bot begin trading.
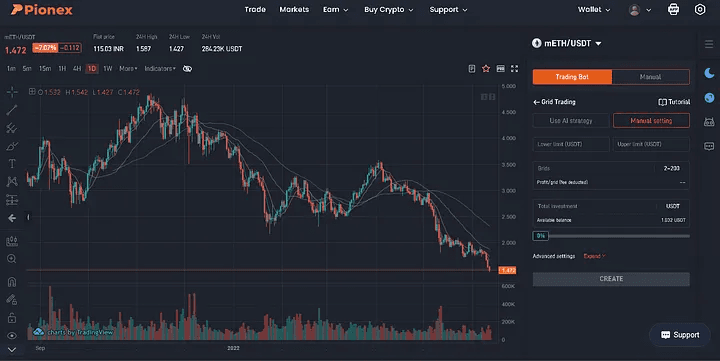
You must define the Lower and Upper limits between which the bot will trade your chosen base coin for you in the Manual setting, as well as the number of grids the bot will create for you between the range you provide (Upper limit-Lower limit) and the amount of money you want to spend. You may select more parameters under the advanced settings, such as the trigger price, stop loss, bot closing price, slippage control, grid mode, and investment coin (either quote coin or both).
11. You will receive a parameters confirmation pop-up as shown below after entering all the necessary information and clicking the Create button. Your bot will be formed when you click Continue, and a notification stating that it was produced successfully will appear on your screen.

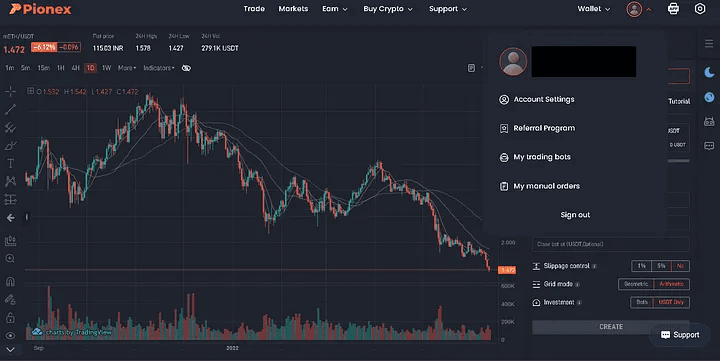
12. If you hover your cursor over your user icon, you will see the My Trading Bots button, which may be used to monitor how your bot is functioning or to stop it.
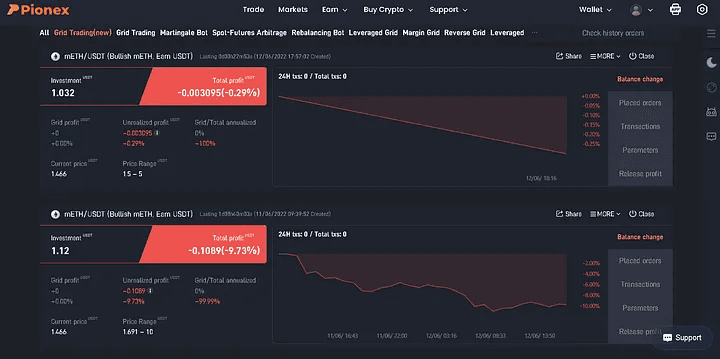
13. Once you click on My Trading Bots, a list of all your bots will appear. Click on Detail to view more specific information about the trades the bot made. If you want to do so, you may also terminate the bot by selecting the Close button beneath the detail section. All of your base coins will be sold to your quotation coin as a result.
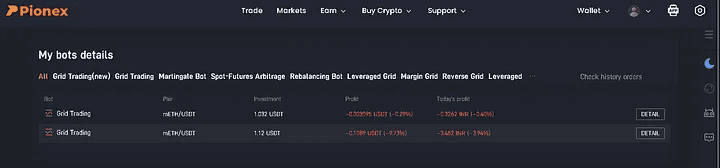
Bot Details
Happy trading !!!
For any further queries or anything related to Python or Azure Development, Coding, Blogging, or Tech Documentation you can DM me on Linkedin or Instagram. Special credits to my team members: Jashan and Anshika.For any kind of work related to DeFi , Smart Contract Development ,Blockchain Development you can contact me at helpmeanubhav@gmail.com
Thank You….
This blog will examine trading using pionex utilizing the digital money. So let’s examine what pionex actually is.
Contents:
Introduction
Features
Steps to Trade on Pionex
Grid Trading Bot
Pionex is a type of cryptocurrency exchange with built-in trading bots that came into prominence in 2020 and has since achieved the status of a significant and well-known exchange supported by investments in fiat currency and aggregated liquidity from the most well-known cryptocurrency exchanges online.
These bots help you to automate your investment strategy so that you don't have to constantly monitor the market. The free integrated bots offered by Pionex, which now reach a high of 16 in total, are one of the platform’s most noteworthy features.
These bots aim to speed up the procedure from registering to trading, add value to Pionex’s offer, and turn the platform into a one-stop shop for beginners in cryptocurrency trading.
The bots also simplify the trading process itself, lowering the expertise threshold and eliminating the need to sacrifice conventional jobs due to the high investment of time on the users’ part.
In order to know more about Pionex and its features, you can visit the following link:
https://earthweb.com/pionex/
Pionex Review 2022: Legit Trading Bots & Exchange or a Scam? - EarthWeb
Having a crypto exchange equipped with its own functioning crypto trading automation tools sure does simplify the…
earthweb.com
Let’s learn how to trade on Pionex by going through the stages listed below:
Visit the Pionex website and login in using your credentials. If you don’t already have an account there, register with your email or phone number. Use referral code BAKNMn0H to get started.
https://www.pionex.com/en-US/
Crypto Trading Robot | Free Crypto Trading Bot | Pionex
Your browser is not supported by Crypto Trading Robot | Free Crypto Trading Bot | Pionex. Or browse the version too…
www.pionex.com
Pionex
Log In
2. You will receive 1288 USDT trial money after logging in for the first time, which you may use to invest in USDT by selecting an appropriate Annual Percent Yield, Duration, Target Price, and Rise/Fall percent to the Target Price. After the Duration, Pionex will only redeem the trial fund, and you may withdraw the interest.
Wallet
The amount highlighted above — 1288 USDT can be withdrawn or be used by you for trading itself
3. When we’re finished using the trial funds, we use the Deposit button, which is located under the Wallet dropdown, to deposit real money into our Pionex Account.
Click the Deposit Button
4. You can put whatever coins or tokens you like here; USDT is the default setting. You may choose the token or coin of your choosing by clicking on the USDT menu as shown below.
USDT Menu
5. I’ll use the BNB Smart Chain Coin as an example. Since BNB Smart Chain is being utilized in this instance for cryptocurrency trading, we choose BEP2 after selecting BNB Coin from the menu. Be cautious while selecting the appropriate token format.
For instance, if you’re sending an ERC-20 USDT token to your wallet and adding USDT, make sure it is in the ERC-20 format. (If you transfer any additional tokens or coins to this address, they won’t be added to your wallet and you risk losing them. The public address that is displayed below may be used to send tokens to our Pionex account or we can scan the QR code.
Chose BNB Smart Coin
After you transfer funds from your Crypto Exchange Wallet to your Pionex Wallet, the transaction status will show completed and your tokens/coins will be reflected in your Deposit history as can be seen above.
6. After adding money to our Pionex Wallet, let’s go on to trading, which is the most exciting aspect. To examine your trading account balance and portfolio, click the Trade tab on the left after selecting it from the top menu.
My trading account balance
7. After clicking on the Trade tab on the top you’ll see a lot of bots available and trading cryptocurrencies. Since we had added BNB tokens to our wallet we select the BNB token as our quote currency by clicking on the dropdown mETH/USDT in this example.
mETH/USDT
After clicking on our quote currency, we’ll see the trading pair that is available for our quote currency, this pair is the base currency that will be used in the trading. For our example, we only have MATIC as the only option available as the base currency, and let's say I’m not interested in trading in MATIC coins, so for this what we do is we trade our BNB coin with another coin that has much more base currency options. Let’s go with USDT in this case.
8. So, what we do now is that first, we select BNB/USDT, then we go to Manual trading to sell our BNB coins for getting some USDT coins. Here you can choose Grid sell or Limit or Market sell your BNB coins as per your choice.
Grid sell or Limit or Market sell
9. You’ll receive a message confirming the transaction, so let’s go create some bots after earning some USDT. You then go to Trade and choose the base currency of your choosing and USDT as the quote currency. (If you wish to experiment, the least number of USDT coins needed to create a trading bot is with mBTC and mETH, which is what I’ll be using in this demonstration.) And a display similar to the one below will appear:
10. Now you need to decide whatever bot you want to build and make sure you meet the minimum expenditure requirement for a bot. Let’s say we decide to construct a Grid Trading Bot. When we click the create button, something like this shows up on our screen.
The next step is to choose the bot you want to build and make sure you meet the minimum cost requirement. Imagine we decide to construct a Grid Trading Bot. When we click on create, something like this displays on our screen.
The AI-use approach, A set of parameters will be recommended to you by Pionex AI Advisor. The parameters were determined by backtesting the previous seven days. As a preview, you’ll see the suggested Price Range and Profit Per Grid. To determine how much of your dollars to utilize, all you have to do is move the slider. regarding the Grid Trading Bot. Once you’ve finished, just click CREATE to have the bot begin trading.
You must define the Lower and Upper limits between which the bot will trade your chosen base coin for you in the Manual setting, as well as the number of grids the bot will create for you between the range you provide (Upper limit-Lower limit) and the amount of money you want to spend. You may select more parameters under the advanced settings, such as the trigger price, stop loss, bot closing price, slippage control, grid mode, and investment coin (either quote coin or both).
11. You will receive a parameters confirmation pop-up as shown below after entering all the necessary information and clicking the Create button. Your bot will be formed when you click Continue, and a notification stating that it was produced successfully will appear on your screen.
12. If you hover your cursor over your user icon, you will see the My Trading Bots button, which may be used to monitor how your bot is functioning or to stop it.
13. Once you click on My Trading Bots, a list of all your bots will appear. Click on Detail to view more specific information about the trades the bot made. If you want to do so, you may also terminate the bot by selecting the Close button beneath the detail section. All of your base coins will be sold to your quotation coin as a result.
Bot Details
Happy trading !!!
For any further queries or anything related to Python or Azure Development, Coding, Blogging, or Tech Documentation you can DM me on Linkedin or Instagram. Special credits to my team members: Jashan and Anshika.For any kind of work related to DeFi , Smart Contract Development ,Blockchain Development you can contact me at helpmeanubhav@gmail.com
Thank You….